

In a earlier initiative, the Speech GPT terminal was launched, which allowed customers to ask questions within the terminal and obtain spoken solutions. This gadget additional enhances the design by utilizing a extra highly effective board to transcribe audio in real-time. Audio transcription is helpful for recording assembly minutes, changing lectures to textual content, and varied different functions. This gadget also can help journalists in transcribing interviews. Right here, GPT and a microphone are employed for transcription.
Raspberry Pi Zero is utilised for speech recognition, a type of synthetic intelligence programming. Understanding and reproducing phonetics requires important coaching and refinement. Nevertheless, some free open supply software program, together with Google-STT, can be utilized for this function.

The creator’s prototype is proven in Fig. 1. The elements wanted to construct this gadget are listed within the Invoice of Supplies desk.
| Invoice of supplies | |
| Elements | Amount |
| Raspberry Pi Zero | 1 |
| PAM8403 | 1 |
| USB microphone | 1 |
| OTG cable for connecting USB microphone | 1 |
| Capacitor C1, C2 (0.1µF) | 2 |
| Capacitor C3, C4 (10µF, 16V) | 2 |
| Resistors R1, R2 (270-ohm) | 2 |
| Resistors (R3, R4 (150-ohm) | 2 |
| 8-ohm, 0.5-watt speaker | 2 |
| On/off change | 1 |
Circuit and dealing
Fig. 2 exhibits the circuit diagram for speech transcription on Raspberry Pi Zero. It’s constructed utilizing Raspberry Pi Zero, PAM8403 amplifier, two audio system, and some different elements.
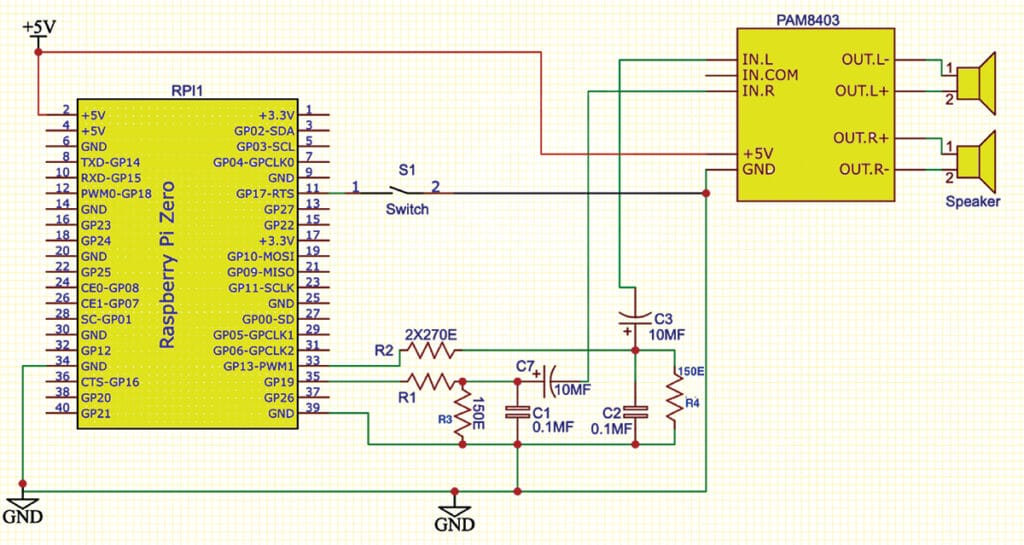
There isn’t a sound output on the Pi Zero board. An HDMI gadget (for instance, a TV) have to be linked to the Pi Zero to get sound. Nevertheless, there’s a neater approach, as proven within the schematic. Any two of the 4 PWM GPIO pins 12, 13, 18, and 19 can be utilized to power audio output by including only one line within the ‘/boot/config.txt’ file – [dtoverlay=audremap,pins_18_13]. Open the file, go to the underside, and add this line, adopted by a reboot. Subsequent time, the audio sign can be obtainable on these two GPIO pins. Simply add a headphone to the IN-L and IN-R to get sound on the headphones. The PAM8403 amplifies the sound additional for a speaker. Fig. 3 exhibits the picture of the OTG cable for connecting the USB microphone.

$> sudo nano /boot/
config.txt
Add the above line and reboot. For Pi-5 the config.txt could also be in one other place. This PAM8403 is rated for 5V however works on 3.3V too.