
As a Python developer, you’re in all probability keen to manage and monitor your Raspberry Pi GPIOs remotely. Nicely, you could have landed in the fitting place.
This text builds upon our earlier introduction to “Visualize your Raspberry Pi information with Arduino Cloud | Half I.” Now, we’ll discover utilizing Python to configure Raspberry Pi GPIOs, a elementary step for a lot of IoT initiatives that’s often thought of because the “good day world” of IoT functions. Whether or not you’re controlling relays or monitoring digital inputs, managing GPIOs is essential.
However IoT functions should be accessed remotely with a dashboard that lets you visualize your system information each in actual time and its historic evolution, in addition to appearing remotely over your system.
Nicely, let’s deep dive into how we will obtain all that!
Bodily setup
On this weblog publish, we present a quite simple however complete instance. We’ll see use an Arduino Cloud dashboard to behave remotely over your Raspberry Pi digital GPIOs. In a nutshell, we’ll see :
- swap on and off an LED that’s related to your Raspberry Pi
- detect when a push button that’s related to your Raspberry Pi is pressed
- visualize the actual time and historic worth of an integer variable
First, let’s join our Raspberry Pi to an LED and a push button as proven within the following diagram.
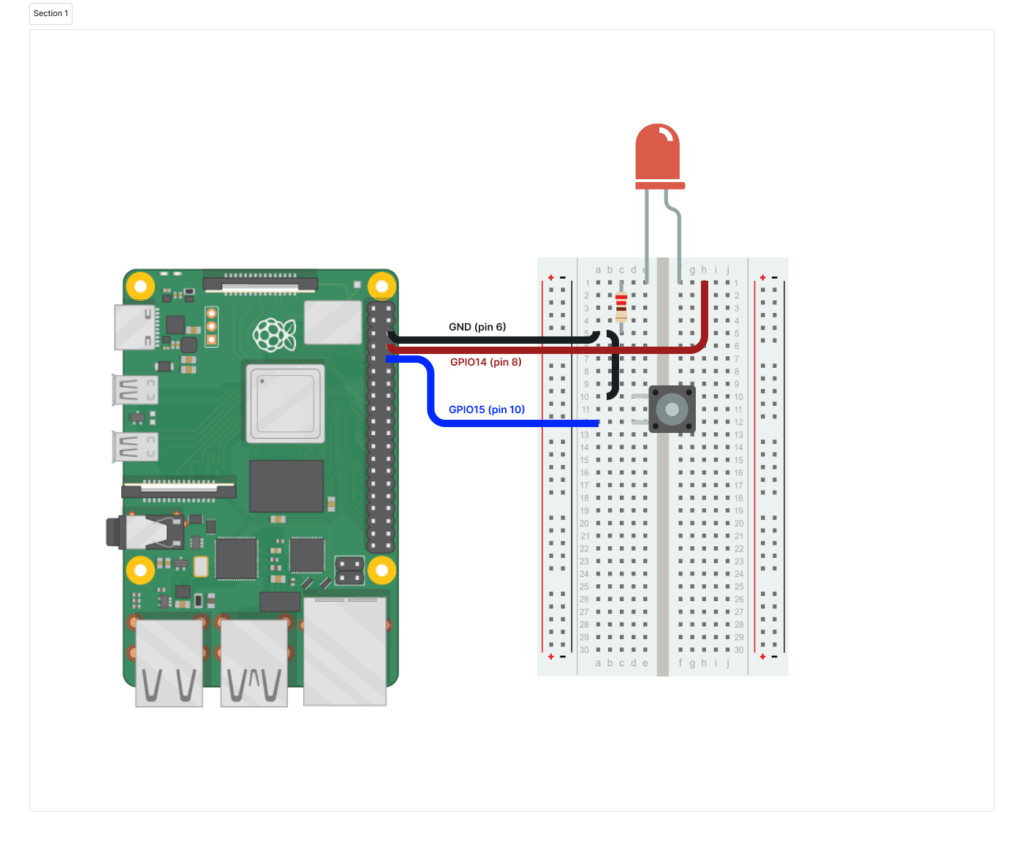
It’s a quite simple setup. Now that we’ve got all the things prepared, let’s get began!
Create the Gadget and Factor in Arduino Cloud
To ship your Raspberry Pi information to the Arduino Cloud, it’s a must to comply with these easy steps:
1. Arrange an Arduino Cloud account in case you didn’t have one earlier than.
2. Create your Gadget as a Handbook system.
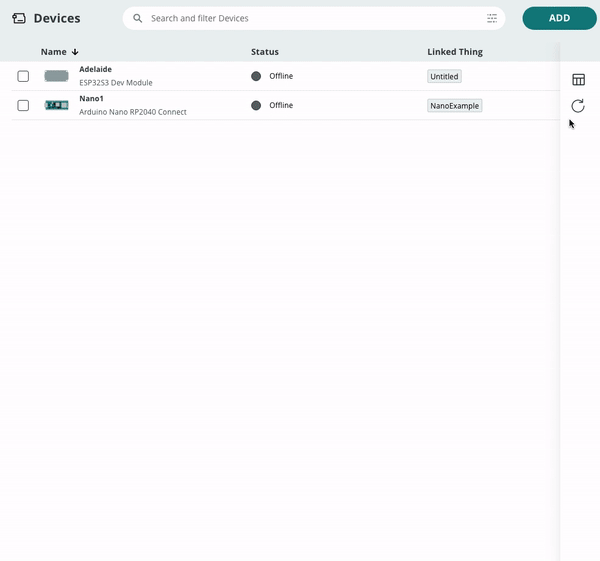
Notice: Notice down your Gadget ID and Secret, as we’ll want them later.
3. Create your Factor and add your variables.
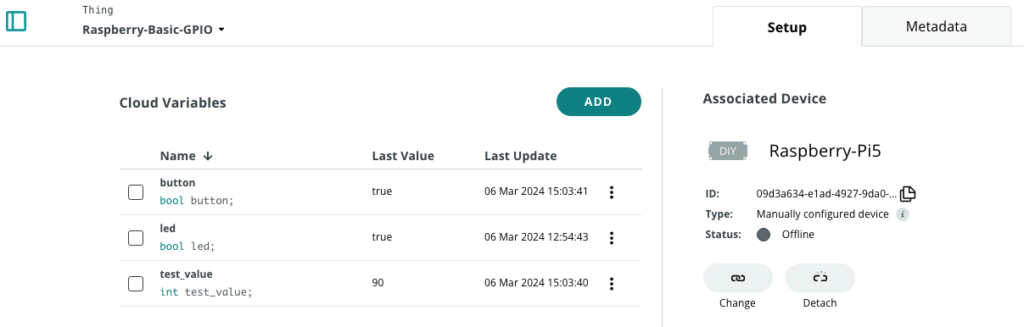
Within the instance proven on this weblog publish, we use the next three variables:
- test_value: We’ll use this integer variable to indicate an integer worth generated periodically in our Raspberry Pi utility in our Arduino Cloud dashboard.
- button: We’ll use this boolean variable to ship the data to the Cloud when the push button is pressed.
- led: We’ll use this boolean variable to modify on and off the LED from the Arduino Cloud dashboard.
4. Create an Arduino Cloud dashboard for information visualization:
- Create a swap widget (title: LED) and a LED widget (title: LED) and linke them to the led variable
- Create a chart widget (title: Worth evolution) and a Worth widget (title: Worth) and hyperlink them to the test_value variable.
- Create a Push button (title: Push Button) and a Standing widget (title: Button) and hyperlink them to the button variable.
With the dashboard, it is possible for you to to:
- Swap ON and OFF the LED utilizing the swap widget.
- Visualize the standing of the LED with the LED widget.
- Visualize the actual time worth of the variable test_value with the Worth widget.
- Visualize the evolution over time of the variable test_value with the chart widget.
- Visualize on the Push Button and Button widgets when the push button has been pressed on the board.
Notice: You’ll find extra detailed data in regards to the full course of in our documentation information.
Program your IoT system utilizing Python
Now it’s time to develop your Python utility.
#! /usr/bin/python3


import random
import gpiod
from gpiod.line import Course, Worth, Bias
from arduino_iot_cloud import ArduinoCloudClient
from credentials import DEVICE_ID, SECRET_KEY


LED=14      # GPIO14, Pin 8
BUTTON=15   # GPIO15, Pin 10


# For Raspberry PI 5, the chip is gpiochip4. Test for different RPI flavours.
chip = gpiod.Chip('/dev/gpiochip4')
req=chip.request_lines(client="rpi-acloud-gpio-basic",
     config= {
        LED    : gpiod.LineSettings(path=Course.OUTPUT),
        BUTTON : gpiod.LineSettings(path=Course.INPUT, bias=Bias.PULL_UP),
     })


# This perform is executed each 1.0 seconds (as outlined within the registration) and
# returns a random integer worth between 0 and 100
def read_button(shopper):
  button = req.get_value(BUTTON)
  if button == Worth.INACTIVE:
     return False
  else:
     return True


# This perform is executed each 10.0 seconds (as outlined within the registration) and
# returns a random integer worth between 0 and 100
def read_value(shopper):
  return random.randint(0, 100)


# This perform is executed every time the "led" variable modifications
def on_led_changed(shopper, worth):
  if worth:
      req.set_value(LED, Worth.ACTIVE)
  else:
      req.set_value(LED, Worth.INACTIVE)
  print("LED change! Standing is: ", worth)


if __name__ == "__main__":
  # Create Arduino Cloud connection
  shopper = ArduinoCloudClient(device_id=DEVICE_ID, username=DEVICE_ID, password=SECRET_KEY)


  # Register the Arduino Cloud variables with the callback features
  shopper.register("test_value", on_read=read_value, interval=10.0)
  shopper.register("button", on_read=read_button, interval=1.0)
  shopper.register("led", worth=None, on_write=on_led_changed)
   # Begin the shopper
  shopper.begin()
Create a file referred to as credentials.py along with your Gadget ID and secret.
#DEVICE_ID = b"YOUR_DEVICE_ID"
#SECRET_KEY = b"YOUR_SECRET_KEY"
This code can be utilized throughout all the assorted Raspberry Pi flavors and it ought to work additionally in any Linux-based machine. Simply beware that it is advisable use the fitting gpiochip and set the fitting GPIO strains within the following code part:
LED=14      # GPIO14, Pin 8
BUTTON=15   # GPIO15, Pin 10

# For Raspberry PI 5, the chip is gpiochip4. Test for different RPI flavours.
chip = gpiod.Chip('/dev/gpiochip4')
You may get extra details about the challenge in Mission Hub and all of the code and extra particulars within the GitHub repository. Moreover, yow will discover a full python information within the following article
Tutorial: Join your Raspberry Pi to Arduino Cloud
Begin with Arduino Cloud at no cost
Connecting your Raspberry Pi to the Arduino Cloud couldn’t be simpler. All it is advisable do is create your free account and you might be able to go. It’s prepared to make use of and it’s free. You possibly can discover the premium options for enhanced performance.
So, in case you’re seeking to streamline information visualization of your Raspberry Pi functions utilizing Python, give the Arduino Cloud a try to leverage its full potential on your initiatives.
Keep tuned for Half III and IV of our Raspberry Pi GPIO primary management weblog publish collection within the Arduino Cloud.