
Right this moment, most purposes can ship a whole lot of requests for a single web page.
For instance, my Twitter house web page sends round 300 requests, and an Amazon
product particulars web page sends round 600 requests. A few of them are for static
belongings (JavaScript, CSS, font information, icons, and so on.), however there are nonetheless
round 100 requests for async information fetching – both for timelines, associates,
or product suggestions, in addition to analytics occasions. That’s fairly a
lot.
The principle motive a web page might include so many requests is to enhance
efficiency and consumer expertise, particularly to make the appliance really feel
sooner to the tip customers. The period of clean pages taking 5 seconds to load is
lengthy gone. In fashionable net purposes, customers sometimes see a primary web page with
model and different components in lower than a second, with further items
loading progressively.
Take the Amazon product element web page for example. The navigation and high
bar seem nearly instantly, adopted by the product photographs, temporary, and
descriptions. Then, as you scroll, “Sponsored” content material, rankings,
suggestions, view histories, and extra seem.Usually, a consumer solely needs a
fast look or to match merchandise (and examine availability), making
sections like “Prospects who purchased this merchandise additionally purchased” much less vital and
appropriate for loading by way of separate requests.
Breaking down the content material into smaller items and loading them in
parallel is an efficient technique, nevertheless it’s removed from sufficient in massive
purposes. There are numerous different points to think about with regards to
fetch information accurately and effectively. Information fetching is a chellenging, not
solely as a result of the character of async programming would not match our linear mindset,
and there are such a lot of elements could cause a community name to fail, but in addition
there are too many not-obvious instances to think about underneath the hood (information
format, safety, cache, token expiry, and so on.).
On this article, I wish to talk about some widespread issues and
patterns it’s best to contemplate with regards to fetching information in your frontend
purposes.
We’ll start with the Asynchronous State Handler sample, which decouples
information fetching from the UI, streamlining your software structure. Subsequent,
we’ll delve into Fallback Markup, enhancing the intuitiveness of your information
fetching logic. To speed up the preliminary information loading course of, we’ll
discover methods for avoiding Request
Waterfall and implementing Parallel Information Fetching. Our dialogue will then cowl Code Splitting to defer
loading non-critical software components and Prefetching information primarily based on consumer
interactions to raise the consumer expertise.
I imagine discussing these ideas by an easy instance is
one of the best method. I goal to begin merely after which introduce extra complexity
in a manageable approach. I additionally plan to maintain code snippets, notably for
styling (I am using TailwindCSS for the UI, which can lead to prolonged
snippets in a React element), to a minimal. For these within the
full particulars, I’ve made them out there on this
repository.
Developments are additionally taking place on the server facet, with methods like
Streaming Server-Aspect Rendering and Server Parts gaining traction in
varied frameworks. Moreover, plenty of experimental strategies are
rising. Nonetheless, these matters, whereas doubtlessly simply as essential, could be
explored in a future article. For now, this dialogue will focus
solely on front-end information fetching patterns.
It is essential to notice that the methods we’re masking are usually not
unique to React or any particular frontend framework or library. I’ve
chosen React for illustration functions because of my intensive expertise with
it in recent times. Nonetheless, rules like Code Splitting,
Prefetching are
relevant throughout frameworks like Angular or Vue.js. The examples I will share
are widespread eventualities you would possibly encounter in frontend growth, regardless
of the framework you utilize.
That stated, let’s dive into the instance we’re going to make use of all through the
article, a Profile display of a Single-Web page Software. It is a typical
software you might need used earlier than, or at the very least the situation is typical.
We have to fetch information from server facet after which at frontend to construct the UI
dynamically with JavaScript.
Introducing the appliance
To start with, on Profile we’ll present the consumer’s temporary (together with
identify, avatar, and a brief description), after which we additionally wish to present
their connections (just like followers on Twitter or LinkedIn
connections). We’ll have to fetch consumer and their connections information from
distant service, after which assembling these information with UI on the display.
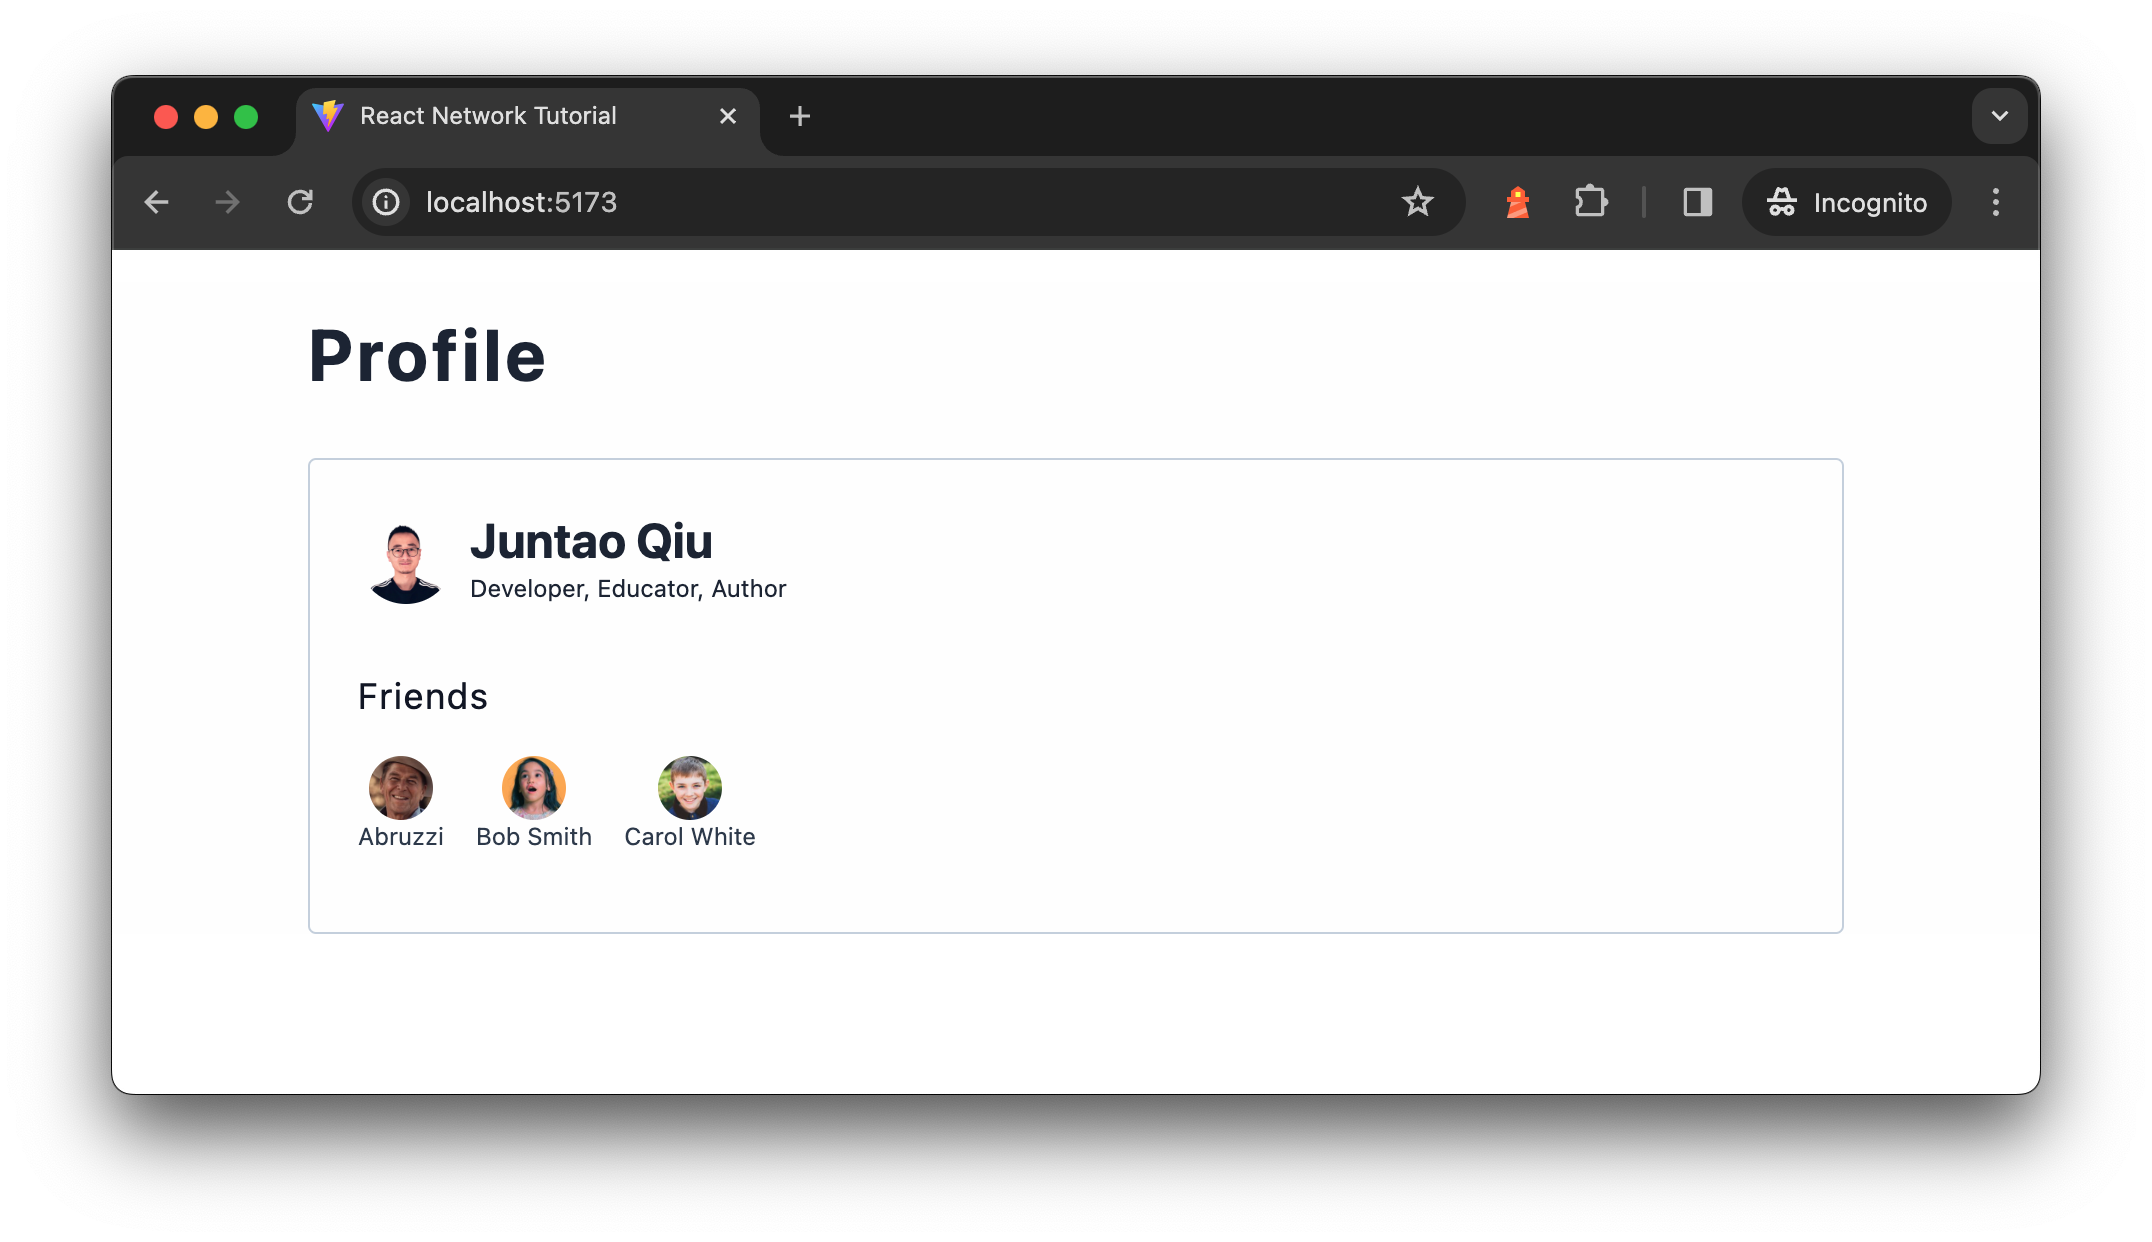
Determine 1: Profile display
The information are from two separate API calls, the consumer temporary API
/customers/<id> returns consumer temporary for a given consumer id, which is an easy
object described as follows:
{
  "id": "u1",
  "identify": "Juntao Qiu",
  "bio": "Developer, Educator, Writer",
  "pursuits": [
    "Technology",
    "Outdoors",
    "Travel"
  ]
}
And the buddy API /customers/<id>/associates endpoint returns a listing of
associates for a given consumer, every listing merchandise within the response is similar as
the above consumer information. The rationale we’ve got two endpoints as an alternative of returning
a associates part of the consumer API is that there are instances the place one
might have too many associates (say 1,000), however most individuals haven’t got many.
This in-balance information construction could be fairly difficult, particularly once we
have to paginate. The purpose right here is that there are instances we have to deal
with a number of community requests.
A short introduction to related React ideas
As this text leverages React as an example varied patterns, I do
not assume a lot about React. Quite than anticipating you to spend so much
of time looking for the precise components within the React documentation, I’ll
briefly introduce these ideas we will make the most of all through this
article. Should you already perceive what React parts are, and the
use of the
useState and useEffect hooks, chances are you’ll
use this hyperlink to skip forward to the subsequent
part.
For these in search of a extra thorough tutorial, the new React documentation is a wonderful
useful resource.
What’s a React Element?
In React, parts are the elemental constructing blocks. To place it
merely, a React element is a operate that returns a bit of UI,
which could be as simple as a fraction of HTML. Think about the
creation of a element that renders a navigation bar:
import React from 'react';

operate Navigation() {
  return (
    <nav>
      <ol>
        <li>House</li>
        <li>Blogs</li>
        <li>Books</li>
      </ol>
    </nav>
  );
}
At first look, the combination of JavaScript with HTML tags may appear
unusual (it is known as JSX, a syntax extension to JavaScript. For these
utilizing TypeScript, an analogous syntax known as TSX is used). To make this
code purposeful, a compiler is required to translate the JSX into legitimate
JavaScript code. After being compiled by Babel,
the code would roughly translate to the next:
operate Navigation() {
  return React.createElement(
    "nav",
    null,
    React.createElement(
      "ol",
      null,
      React.createElement("li", null, "House"),
      React.createElement("li", null, "Blogs"),
      React.createElement("li", null, "Books")
    )
  );
}
Word right here the translated code has a operate known as
React.createElement, which is a foundational operate in
React for creating components. JSX written in React parts is compiled
all the way down to React.createElement calls behind the scenes.
The fundamental syntax of React.createElement is:
React.createElement(sort, [props], [...children])
sort: A string (e.g., ‘div’, ‘span’) indicating the kind of
DOM node to create, or a React element (class or purposeful) for
extra refined buildings.props: An object containing properties handed to the
aspect or element, together with occasion handlers, types, and attributes
likeclassNameandid.kids: These non-compulsory arguments could be further
React.createElementcalls, strings, numbers, or any combine
thereof, representing the aspect’s kids.
As an illustration, a easy aspect could be created with
React.createElement as follows:
React.createElement('div', { className: 'greeting' }, 'Hi there, world!');
That is analogous to the JSX model:
<div className="greeting">Hi there, world!</div>
Beneath the floor, React invokes the native DOM API (e.g.,
doc.createElement("ol")) to generate DOM components as obligatory.
You may then assemble your customized parts right into a tree, just like
HTML code:
import React from 'react';
import Navigation from './Navigation.tsx';
import Content material from './Content material.tsx';
import Sidebar from './Sidebar.tsx';
import ProductList from './ProductList.tsx';

operate App() {
  return <Web page />;
}

operate Web page() {
  return <Container>
    <Navigation />
    <Content material>
      <Sidebar />
      <ProductList />
    </Content material>
    <Footer />
  </Container>;
}
In the end, your software requires a root node to mount to, at
which level React assumes management and manages subsequent renders and
re-renders:
import ReactDOM from "react-dom/shopper";
import App from "./App.tsx";

const root = ReactDOM.createRoot(doc.getElementById('root'));
root.render(<App />);
Producing Dynamic Content material with JSX
The preliminary instance demonstrates an easy use case, however
let’s discover how we will create content material dynamically. As an illustration, how
can we generate a listing of information dynamically? In React, as illustrated
earlier, a element is basically a operate, enabling us to cross
parameters to it.
import React from 'react';

operate Navigation({ nav }) {
  return (
    <nav>
      <ol>
        {nav.map(merchandise => <li key={merchandise}>{merchandise}</li>)}
      </ol>
    </nav>
  );
}
On this modified Navigation element, we anticipate the
parameter to be an array of strings. We make the most of the map
operate to iterate over every merchandise, reworking them into
<li> components. The curly braces {} signify
that the enclosed JavaScript expression must be evaluated and
rendered. For these curious in regards to the compiled model of this dynamic
content material dealing with:
operate Navigation(props) {
  var nav = props.nav;

  return React.createElement(
    "nav",
    null,
    React.createElement(
      "ol",
      null,
      nav.map(operate(merchandise) {
        return React.createElement("li", { key: merchandise }, merchandise);
      })
    )
  );
}
As a substitute of invoking Navigation as a daily operate,
using JSX syntax renders the element invocation extra akin to
writing markup, enhancing readability:
// As a substitute of this
Navigation(["Home", "Blogs", "Books"])

// We do that
<Navigation nav={["Home", "Blogs", "Books"]} />
Parts in React can obtain various information, often called props, to
modify their habits, very similar to passing arguments right into a operate (the
distinction lies in utilizing JSX syntax, making the code extra acquainted and
readable to these with HTML information, which aligns properly with the talent
set of most frontend builders).
import React from 'react';
import Checkbox from './Checkbox';
import BookList from './BookList';

operate App() {
  let showNewOnly = false; // This flag's worth is usually set primarily based on particular logic.

  const filteredBooks = showNewOnly
    ? booksData.filter(e book => e book.isNewPublished)
    : booksData;

  return (
    <div>
      <Checkbox checked={showNewOnly}>
        Present New Revealed Books Solely
      </Checkbox>
      <BookList books={filteredBooks} />
    </div>
  );
}
On this illustrative code snippet (non-functional however supposed to
reveal the idea), we manipulate the BookList
element’s displayed content material by passing it an array of books. Relying
on the showNewOnly flag, this array is both all out there
books or solely these which are newly revealed, showcasing how props can
be used to dynamically alter element output.
Managing Inner State Between Renders: useState
Constructing consumer interfaces (UI) usually transcends the technology of
static HTML. Parts continuously have to “keep in mind” sure states and
reply to consumer interactions dynamically. As an illustration, when a consumer
clicks an “Add” button in a Product element, it’s a necessity to replace
the ShoppingCart element to mirror each the whole value and the
up to date merchandise listing.
Within the earlier code snippet, making an attempt to set the
showNewOnly variable to true inside an occasion
handler doesn’t obtain the specified impact:
operate App () {
  let showNewOnly = false;

  const handleCheckboxChange = () => {
    showNewOnly = true; // this does not work
  };

  const filteredBooks = showNewOnly
    ? booksData.filter(e book => e book.isNewPublished)
    : booksData;

  return (
    <div>
      <Checkbox checked={showNewOnly} onChange={handleCheckboxChange}>
        Present New Revealed Books Solely
      </Checkbox>

      <BookList books={filteredBooks}/>
    </div>
  );
};
This method falls brief as a result of native variables inside a operate
element don’t persist between renders. When React re-renders this
element, it does so from scratch, disregarding any modifications made to
native variables since these don’t set off re-renders. React stays
unaware of the necessity to replace the element to mirror new information.
This limitation underscores the need for React’s
state. Particularly, purposeful parts leverage the
useState hook to recollect states throughout renders. Revisiting
the App instance, we will successfully keep in mind the
showNewOnly state as follows:
import React, { useState } from 'react';
import Checkbox from './Checkbox';
import BookList from './BookList';

operate App () {
  const [showNewOnly, setShowNewOnly] = useState(false);

  const handleCheckboxChange = () => {
    setShowNewOnly(!showNewOnly);
  };

  const filteredBooks = showNewOnly
    ? booksData.filter(e book => e book.isNewPublished)
    : booksData;

  return (
    <div>
      <Checkbox checked={showNewOnly} onChange={handleCheckboxChange}>
        Present New Revealed Books Solely
      </Checkbox>

      <BookList books={filteredBooks}/>
    </div>
  );
};
The useState hook is a cornerstone of React’s Hooks system,
launched to allow purposeful parts to handle inner state. It
introduces state to purposeful parts, encapsulated by the next
syntax:
const [state, setState] = useState(initialState);
initialState: This argument is the preliminary
worth of the state variable. It may be a easy worth like a quantity,
string, boolean, or a extra complicated object or array. The
initialStateis simply used in the course of the first render to
initialize the state.- Return Worth:
useStatereturns an array with
two components. The primary aspect is the present state worth, and the
second aspect is a operate that permits updating this worth. By utilizing
array destructuring, we assign names to those returned gadgets,
sometimesstateandsetState, although you possibly can
select any legitimate variable names. state: Represents the present worth of the
state. It is the worth that shall be used within the element’s UI and
logic.setState: A operate to replace the state. This operate
accepts a brand new state worth or a operate that produces a brand new state primarily based
on the earlier state. When known as, it schedules an replace to the
element’s state and triggers a re-render to mirror the modifications.
React treats state as a snapshot; updating it would not alter the
present state variable however as an alternative triggers a re-render. Throughout this
re-render, React acknowledges the up to date state, making certain the
BookList element receives the proper information, thereby
reflecting the up to date e book listing to the consumer. This snapshot-like
habits of state facilitates the dynamic and responsive nature of React
parts, enabling them to react intuitively to consumer interactions and
different modifications.
Managing Aspect Results: useEffect
Earlier than diving deeper into our dialogue, it is essential to handle the
idea of unwanted effects. Unwanted side effects are operations that work together with
the skin world from the React ecosystem. Frequent examples embody
fetching information from a distant server or dynamically manipulating the DOM,
comparable to altering the web page title.
React is primarily involved with rendering information to the DOM and does
not inherently deal with information fetching or direct DOM manipulation. To
facilitate these unwanted effects, React offers the useEffect
hook. This hook permits the execution of unwanted effects after React has
accomplished its rendering course of. If these unwanted effects lead to information
modifications, React schedules a re-render to mirror these updates.
The useEffect Hook accepts two arguments:
- A operate containing the facet impact logic.
- An non-compulsory dependency array specifying when the facet impact must be
re-invoked.
Omitting the second argument causes the facet impact to run after
each render. Offering an empty array [] signifies that your impact
doesn’t rely on any values from props or state, thus not needing to
re-run. Together with particular values within the array means the facet impact
solely re-executes if these values change.
When coping with asynchronous information fetching, the workflow inside
useEffect entails initiating a community request. As soon as the info is
retrieved, it’s captured by way of the useState hook, updating the
element’s inner state and preserving the fetched information throughout
renders. React, recognizing the state replace, undertakes one other render
cycle to include the brand new information.
This is a sensible instance about information fetching and state
administration:
import { useEffect, useState } from "react";

sort Person = {
  id: string;
  identify: string;
};

const UserSection = ({ id }) => {
  const [user, setUser] = useState<Person | undefined>();

  useEffect(() => {
    const fetchUser = async () => {
      const response = await fetch(`/api/customers/${id}`);
      const jsonData = await response.json();
      setUser(jsonData);
    };

    fetchUser();
  }, tag:martinfowler.com,2024-05-23:Code-Splitting-in-Single-Web page-Purposes);

  return <div>
    <h2>{consumer?.identify}</h2>
  </div>;
};
Within the code snippet above, inside useEffect, an
asynchronous operate fetchUser is outlined after which
instantly invoked. This sample is critical as a result of
useEffect doesn’t immediately help async capabilities as its
callback. The async operate is outlined to make use of await for
the fetch operation, making certain that the code execution waits for the
response after which processes the JSON information. As soon as the info is obtainable,
it updates the element’s state by way of setUser.
The dependency array tag:martinfowler.com,2024-05-23:Code-Splitting-in-Single-Web page-Purposes on the finish of the
useEffect name ensures that the impact runs once more provided that
id modifications, which prevents pointless community requests on
each render and fetches new consumer information when the id prop
updates.
This method to dealing with asynchronous information fetching inside
useEffect is a normal apply in React growth, providing a
structured and environment friendly technique to combine async operations into the
React element lifecycle.
As well as, in sensible purposes, managing totally different states
comparable to loading, error, and information presentation is important too (we’ll
see it the way it works within the following part). For instance, contemplate
implementing standing indicators inside a Person element to mirror
loading, error, or information states, enhancing the consumer expertise by
offering suggestions throughout information fetching operations.

Determine 2: Totally different statuses of a
element
This overview affords only a fast glimpse into the ideas utilized
all through this text. For a deeper dive into further ideas and
patterns, I like to recommend exploring the new React
documentation or consulting different on-line sources.
With this basis, it’s best to now be outfitted to affix me as we delve
into the info fetching patterns mentioned herein.
Implement the Profile element
Let’s create the Profile element to make a request and
render the consequence. In typical React purposes, this information fetching is
dealt with inside a useEffect block. This is an instance of how
this could be applied:
import { useEffect, useState } from "react";

const Profile = ({ id }: { id: string }) => {
  const [user, setUser] = useState<Person | undefined>();

  useEffect(() => {
    const fetchUser = async () => {
      const response = await fetch(`/api/customers/${id}`);
      const jsonData = await response.json();
      setUser(jsonData);
    };

    fetchUser();
  }, tag:martinfowler.com,2024-05-23:Code-Splitting-in-Single-Web page-Purposes);

  return (
    <UserBrief consumer={consumer} />
  );
};
This preliminary method assumes community requests full
instantaneously, which is usually not the case. Actual-world eventualities require
dealing with various community circumstances, together with delays and failures. To
handle these successfully, we incorporate loading and error states into our
element. This addition permits us to offer suggestions to the consumer throughout
information fetching, comparable to displaying a loading indicator or a skeleton display
if the info is delayed, and dealing with errors once they happen.
Right here’s how the improved element appears to be like with added loading and error
administration:
import { useEffect, useState } from "react";
import { get } from "../utils.ts";

import sort { Person } from "../sorts.ts";

const Profile = ({ id }: { id: string }) => {
  const [loading, setLoading] = useState<boolean>(false);
  const [error, setError] = useState<Error | undefined>();
  const [user, setUser] = useState<Person | undefined>();

  useEffect(() => {
    const fetchUser = async () => {
      strive {
        setLoading(true);
        const information = await get<Person>(`/customers/${id}`);
        setUser(information);
      } catch (e) {
        setError(e as Error);
      } lastly {
        setLoading(false);
      }
    };

    fetchUser();
  }, tag:martinfowler.com,2024-05-23:Code-Splitting-in-Single-Web page-Purposes);

  if (loading || !consumer) {
    return <div>Loading...</div>;
  }

  return (
    <>
      {consumer && <UserBrief consumer={consumer} />}
    </>
  );
};
Now in Profile element, we provoke states for loading,
errors, and consumer information with useState. Utilizing
useEffect, we fetch consumer information primarily based on id,
toggling loading standing and dealing with errors accordingly. Upon profitable
information retrieval, we replace the consumer state, else show a loading
indicator.
The get operate, as demonstrated under, simplifies
fetching information from a selected endpoint by appending the endpoint to a
predefined base URL. It checks the response’s success standing and both
returns the parsed JSON information or throws an error for unsuccessful requests,
streamlining error dealing with and information retrieval in our software. Word
it is pure TypeScript code and can be utilized in different non-React components of the
software.
const baseurl = "https://icodeit.com.au/api/v2";

async operate get<T>(url: string): Promise<T> {
  const response = await fetch(`${baseurl}${url}`);

  if (!response.okay) {
    throw new Error("Community response was not okay");
  }

  return await response.json() as Promise<T>;
}
React will attempt to render the element initially, however as the info
consumer isn’t out there, it returns “loading…” in a
div. Then the useEffect is invoked, and the
request is kicked off. As soon as sooner or later, the response returns, React
re-renders the Profile element with consumer
fulfilled, so now you can see the consumer part with identify, avatar, and
title.
If we visualize the timeline of the above code, you will notice
the next sequence. The browser firstly downloads the HTML web page, and
then when it encounters script tags and elegance tags, it would cease and
obtain these information, after which parse them to type the ultimate web page. Word
that this can be a comparatively difficult course of, and I’m oversimplifying
right here, however the primary concept of the sequence is appropriate.
Determine 3: Fetching consumer
information
So React can begin to render solely when the JS are parsed and executed,
after which it finds the useEffect for information fetching; it has to attend till
the info is obtainable for a re-render.
Now within the browser, we will see a “loading…” when the appliance
begins, after which after just a few seconds (we will simulate such case by add
some delay within the API endpoints) the consumer temporary part exhibits up when information
is loaded.

Determine 4: Person temporary element
This code construction (in useEffect to set off request, and replace states
like loading and error correspondingly) is
broadly used throughout React codebases. In purposes of normal measurement, it is
widespread to seek out quite a few cases of such similar data-fetching logic
dispersed all through varied parts.
Asynchronous State Handler
Wrap asynchronous queries with meta-queries for the state of the
question.
Distant calls could be gradual, and it is important to not let the UI freeze
whereas these calls are being made. Subsequently, we deal with them asynchronously
and use indicators to indicate {that a} course of is underway, which makes the
consumer expertise higher – understanding that one thing is going on.
Moreover, distant calls would possibly fail because of connection points,
requiring clear communication of those failures to the consumer. Subsequently,
it is best to encapsulate every distant name inside a handler module that
manages outcomes, progress updates, and errors. This module permits the UI
to entry metadata in regards to the standing of the decision, enabling it to show
various data or choices if the anticipated outcomes fail to
materialize.
A easy implementation might be a operate getAsyncStates that
returns these metadata, it takes a URL as its parameter and returns an
object containing data important for managing asynchronous
operations. This setup permits us to appropriately reply to totally different
states of a community request, whether or not it is in progress, efficiently
resolved, or has encountered an error.
const { loading, error, information } = getAsyncStates(url);

if (loading) {
  // Show a loading spinner
}

if (error) {
  // Show an error message
}

// Proceed to render utilizing the info
The belief right here is that getAsyncStates initiates the
community request mechanically upon being known as. Nonetheless, this may not
all the time align with the caller’s wants. To supply extra management, we will additionally
expose a fetch operate inside the returned object, permitting
the initiation of the request at a extra acceptable time, based on the
caller’s discretion. Moreover, a refetch operate might
be offered to allow the caller to re-initiate the request as wanted,
comparable to after an error or when up to date information is required. The
fetch and refetch capabilities could be equivalent in
implementation, or refetch would possibly embody logic to examine for
cached outcomes and solely re-fetch information if obligatory.
const { loading, error, information, fetch, refetch } = getAsyncStates(url);

const onInit = () => {
  fetch();
};

const onRefreshClicked = () => {
  refetch();
};

if (loading) {
  // Show a loading spinner
}

if (error) {
  // Show an error message
}

// Proceed to render utilizing the info
This sample offers a flexible method to dealing with asynchronous
requests, giving builders the flexibleness to set off information fetching
explicitly and handle the UI’s response to loading, error, and success
states successfully. By decoupling the fetching logic from its initiation,
purposes can adapt extra dynamically to consumer interactions and different
runtime circumstances, enhancing the consumer expertise and software
reliability.
Implementing Asynchronous State Handler in React with hooks
The sample could be applied in numerous frontend libraries. For
occasion, we might distill this method right into a customized Hook in a React
software for the Profile element:
import { useEffect, useState } from "react";
import { get } from "../utils.ts";

const useUser = (id: string) => {
  const [loading, setLoading] = useState<boolean>(false);
  const [error, setError] = useState<Error | undefined>();
  const [user, setUser] = useState<Person | undefined>();

  useEffect(() => {
    const fetchUser = async () => {
      strive {
        setLoading(true);
        const information = await get<Person>(`/customers/${id}`);
        setUser(information);
      } catch (e) {
        setError(e as Error);
      } lastly {
        setLoading(false);
      }
    };

    fetchUser();
  }, tag:martinfowler.com,2024-05-23:Code-Splitting-in-Single-Web page-Purposes);

  return {
    loading,
    error,
    consumer,
  };
};
Please be aware that within the customized Hook, we haven’t any JSX code –
that means it’s very UI free however sharable stateful logic. And the
useUser launch information mechanically when known as. Throughout the Profile
element, leveraging the useUser Hook simplifies its logic:
import { useUser } from './useUser.ts';
import UserBrief from './UserBrief.tsx';

const Profile = ({ id }: { id: string }) => {
  const { loading, error, consumer } = useUser(id);

  if (loading || !consumer) {
    return <div>Loading...</div>;
  }

  if (error) {
    return <div>One thing went fallacious...</div>;
  }

  return (
    <>
      {consumer && <UserBrief consumer={consumer} />}
    </>
  );
};
Generalizing Parameter Utilization
In most purposes, fetching various kinds of information—from consumer
particulars on a homepage to product lists in search outcomes and
suggestions beneath them—is a standard requirement. Writing separate
fetch capabilities for every sort of information could be tedious and tough to
keep. A greater method is to summary this performance right into a
generic, reusable hook that may deal with varied information sorts
effectively.
Think about treating distant API endpoints as companies, and use a generic
useService hook that accepts a URL as a parameter whereas managing all
the metadata related to an asynchronous request:
import { get } from "../utils.ts";

operate useService<T>(url: string) {
  const [loading, setLoading] = useState<boolean>(false);
  const [error, setError] = useState<Error | undefined>();
  const [data, setData] = useState<T | undefined>();

  const fetch = async () => {
    strive {
      setLoading(true);
      const information = await get<T>(url);
      setData(information);
    } catch (e) {
      setError(e as Error);
    } lastly {
      setLoading(false);
    }
  };

  return {
    loading,
    error,
    information,
    fetch,
  };
}
This hook abstracts the info fetching course of, making it simpler to
combine into any element that should retrieve information from a distant
supply. It additionally centralizes widespread error dealing with eventualities, comparable to
treating particular errors in another way:
import { useService } from './useService.ts';

const {
  loading,
  error,
  information: consumer,
  fetch: fetchUser,
} = useService(`/customers/${id}`);
By utilizing useService, we will simplify how parts fetch and deal with
information, making the codebase cleaner and extra maintainable.
Variation of the sample
A variation of the useUser could be expose the
fetchUsers operate, and it doesn’t set off the info
fetching itself:
import { useState } from "react";

const useUser = (id: string) => {
  // outline the states

  const fetchUser = async () => {
    strive {
      setLoading(true);
      const information = await get<Person>(`/customers/${id}`);
      setUser(information);
    } catch (e) {
      setError(e as Error);
    } lastly {
      setLoading(false);
    }
  };

  return {
    loading,
    error,
    consumer,
    fetchUser,
  };
};
After which on the calling web site, Profile element use
useEffect to fetch the info and render totally different
states.
const Profile = ({ id }: { id: string }) => {
  const { loading, error, consumer, fetchUser } = useUser(id);

  useEffect(() => {
    fetchUser();
  }, []);

  // render correspondingly
};
The benefit of this division is the power to reuse these stateful
logics throughout totally different parts. As an illustration, one other element
needing the identical information (a consumer API name with a consumer ID) can merely import
the useUser Hook and make the most of its states. Totally different UI
parts would possibly select to work together with these states in varied methods,
maybe utilizing various loading indicators (a smaller spinner that
suits to the calling element) or error messages, but the elemental
logic of fetching information stays constant and shared.
When to make use of it
Separating information fetching logic from UI parts can typically
introduce pointless complexity, notably in smaller purposes.
Holding this logic built-in inside the element, just like the
css-in-js method, simplifies navigation and is less complicated for some
builders to handle. In my article, Modularizing
React Purposes with Established UI Patterns, I explored
varied ranges of complexity in software buildings. For purposes
which are restricted in scope — with just some pages and a number of other information
fetching operations — it is usually sensible and likewise really useful to
keep information fetching inside the UI parts.
Nonetheless, as your software scales and the event staff grows,
this technique might result in inefficiencies. Deep element bushes can gradual
down your software (we’ll see examples in addition to how you can handle
them within the following sections) and generate redundant boilerplate code.
Introducing an Asynchronous State Handler can mitigate these points by
decoupling information fetching from UI rendering, enhancing each efficiency
and maintainability.
It’s essential to stability simplicity with structured approaches as your
undertaking evolves. This ensures your growth practices stay
efficient and conscious of the appliance’s wants, sustaining optimum
efficiency and developer effectivity whatever the undertaking
scale.
Implement the Mates listing
Now let’s take a look on the second part of the Profile – the buddy
listing. We will create a separate element Mates and fetch information in it
(through the use of a useService customized hook we outlined above), and the logic is
fairly just like what we see above within the Profile element.
const Mates = ({ id }: { id: string }) => {
  const { loading, error, information: associates } = useService(`/customers/${id}/associates`);

  // loading & error dealing with...

  return (
    <div>
      <h2>Mates</h2>
      <div>
        {associates.map((consumer) => (
        // render consumer listing
        ))}
      </div>
    </div>
  );
};
After which within the Profile element, we will use Mates as a daily
element, and cross in id as a prop:
const Profile = ({ id }: { id: string }) => {
  //...

  return (
    <>
      {consumer && <UserBrief consumer={consumer} />}
      <Mates id={id} />
    </>
  );
};
The code works tremendous, and it appears to be like fairly clear and readable,
UserBrief renders a consumer object handed in, whereas
Mates handle its personal information fetching and rendering logic
altogether. If we visualize the element tree, it might be one thing like
this:
Determine 5: Element construction
Each the Profile and Mates have logic for
information fetching, loading checks, and error dealing with. Since there are two
separate information fetching calls, and if we have a look at the request timeline, we
will discover one thing fascinating.
Determine 6: Request waterfall
The Mates element will not provoke information fetching till the consumer
state is ready. That is known as the Fetch-On-Render method,
the place the preliminary rendering is paused as a result of the info is not out there,
requiring React to attend for the info to be retrieved from the server
facet.
This ready interval is considerably inefficient, contemplating that whereas
React’s rendering course of solely takes just a few milliseconds, information fetching can
take considerably longer, usually seconds. Because of this, the Mates
element spends most of its time idle, ready for information. This situation
results in a standard problem often called the Request Waterfall, a frequent
incidence in frontend purposes that contain a number of information fetching
operations.
Parallel Information Fetching
Run distant information fetches in parallel to reduce wait time
Think about once we construct a bigger software {that a} element that
requires information could be deeply nested within the element tree, to make the
matter worse these parts are developed by totally different groups, it’s exhausting
to see whom we’re blocking.
Determine 7: Request waterfall
Request Waterfalls can degrade consumer
expertise, one thing we goal to keep away from. Analyzing the info, we see that the
consumer API and associates API are impartial and could be fetched in parallel.
Initiating these parallel requests turns into vital for software
efficiency.
One method is to centralize information fetching at the next degree, close to the
root. Early within the software’s lifecycle, we begin all information fetches
concurrently. Parts depending on this information wait just for the
slowest request, sometimes leading to sooner total load occasions.
We might use the Promise API Promise.all to ship
each requests for the consumer’s primary data and their associates listing.
Promise.all is a JavaScript technique that permits for the
concurrent execution of a number of guarantees. It takes an array of guarantees
as enter and returns a single Promise that resolves when all the enter
guarantees have resolved, offering their outcomes as an array. If any of the
guarantees fail, Promise.all instantly rejects with the
motive of the primary promise that rejects.
As an illustration, on the software’s root, we will outline a complete
information mannequin:
sort ProfileState = {
  consumer: Person;
  associates: Person[];
};

const getProfileData = async (id: string) =>
  Promise.all([
    get<User>(`/users/${id}`),
    get<User[]>(`/customers/${id}/associates`),
  ]);

const App = () => {
  // fetch information on the very begining of the appliance launch
  const onInit = () => {
    const [user, friends] = await getProfileData(id);
  }

  // render the sub tree correspondingly
}
Implementing Parallel Information Fetching in React
Upon software launch, information fetching begins, abstracting the
fetching course of from subcomponents. For instance, in Profile element,
each UserBrief and Mates are presentational parts that react to
the handed information. This fashion we might develop these element individually
(including types for various states, for instance). These presentational
parts usually are straightforward to check and modify as we’ve got separate the
information fetching and rendering.
We will outline a customized hook useProfileData that facilitates
parallel fetching of information associated to a consumer and their associates through the use of
Promise.all. This technique permits simultaneous requests, optimizing the
loading course of and structuring the info right into a predefined format recognized
as ProfileData.
Right here’s a breakdown of the hook implementation:
import { useCallback, useEffect, useState } from "react";

sort ProfileData = {
  consumer: Person;
  associates: Person[];
};

const useProfileData = (id: string) => {
  const [loading, setLoading] = useState<boolean>(false);
  const [error, setError] = useState<Error | undefined>(undefined);
  const [profileState, setProfileState] = useState<ProfileData>();

  const fetchProfileState = useCallback(async () => {
    strive {
      setLoading(true);
      const [user, friends] = await Promise.all([
        get<User>(`/users/${id}`),
        get<User[]>(`/customers/${id}/associates`),
      ]);
      setProfileState({ consumer, associates });
    } catch (e) {
      setError(e as Error);
    } lastly {
      setLoading(false);
    }
  }, tag:martinfowler.com,2024-05-23:Code-Splitting-in-Single-Web page-Purposes);

  return {
    loading,
    error,
    profileState,
    fetchProfileState,
  };

};
This hook offers the Profile element with the
obligatory information states (loading, error,
profileState) together with a fetchProfileState
operate, enabling the element to provoke the fetch operation as
wanted. Word right here we use useCallback hook to wrap the async
operate for information fetching. The useCallback hook in React is used to
memoize capabilities, making certain that the identical operate occasion is
maintained throughout element re-renders until its dependencies change.
Much like the useEffect, it accepts the operate and a dependency
array, the operate will solely be recreated if any of those dependencies
change, thereby avoiding unintended habits in React’s rendering
cycle.
The Profile element makes use of this hook and controls the info fetching
timing by way of useEffect:
const Profile = ({ id }: { id: string }) => {
  const { loading, error, profileState, fetchProfileState } = useProfileData(id);

  useEffect(() => {
    fetchProfileState();
  }, [fetchProfileState]);

  if (loading) {
    return <div>Loading...</div>;
  }

  if (error) {
    return <div>One thing went fallacious...</div>;
  }

  return (
    <>
      {profileState && (
        <>
          <UserBrief consumer={profileState.consumer} />
          <Mates customers={profileState.associates} />
        </>
      )}
    </>
  );
};
This method is also referred to as Fetch-Then-Render, suggesting that the goal
is to provoke requests as early as attainable throughout web page load.
Subsequently, the fetched information is utilized to drive React’s rendering of
the appliance, bypassing the necessity to handle information fetching amidst the
rendering course of. This technique simplifies the rendering course of,
making the code simpler to check and modify.
And the element construction, if visualized, could be just like the
following illustration
Determine 8: Element construction after refactoring
And the timeline is far shorter than the earlier one as we ship two
requests in parallel. The Mates element can render in just a few
milliseconds as when it begins to render, the info is already prepared and
handed in.
Determine 9: Parallel requests
Word that the longest wait time will depend on the slowest community
request, which is far sooner than the sequential ones. And if we might
ship as many of those impartial requests on the similar time at an higher
degree of the element tree, a greater consumer expertise could be
anticipated.
As purposes develop, managing an growing variety of requests at
root degree turns into difficult. That is notably true for parts
distant from the foundation, the place passing down information turns into cumbersome. One
method is to retailer all information globally, accessible by way of capabilities (like
Redux or the React Context API), avoiding deep prop drilling.
When to make use of it
Working queries in parallel is beneficial at any time when such queries could also be
gradual and do not considerably intrude with every others’ efficiency.
That is often the case with distant queries. Even when the distant
machine’s I/O and computation is quick, there’s all the time potential latency
points within the distant calls. The principle drawback for parallel queries
is setting them up with some type of asynchronous mechanism, which can be
tough in some language environments.
The principle motive to not use parallel information fetching is once we do not
know what information must be fetched till we have already fetched some
information. Sure eventualities require sequential information fetching because of
dependencies between requests. As an illustration, contemplate a situation on a
Profile web page the place producing a customized advice feed
will depend on first buying the consumer’s pursuits from a consumer API.
This is an instance response from the consumer API that features
pursuits:
{
  "id": "u1",
  "identify": "Juntao Qiu",
  "bio": "Developer, Educator, Writer",
  "pursuits": [
    "Technology",
    "Outdoors",
    "Travel"
  ]
}
In such instances, the advice feed can solely be fetched after
receiving the consumer’s pursuits from the preliminary API name. This
sequential dependency prevents us from using parallel fetching, as
the second request depends on information obtained from the primary.
Given these constraints, it turns into essential to debate various
methods in asynchronous information administration. One such technique is
Fallback Markup. This method permits builders to specify what
information is required and the way it must be fetched in a approach that clearly
defines dependencies, making it simpler to handle complicated information
relationships in an software.
One other instance of when arallel Information Fetching just isn’t relevant is
that in eventualities involving consumer interactions that require real-time
information validation.
Think about the case of a listing the place every merchandise has an “Approve” context
menu. When a consumer clicks on the “Approve” possibility for an merchandise, a dropdown
menu seems providing selections to both “Approve” or “Reject.” If this
merchandise’s approval standing might be modified by one other admin concurrently,
then the menu choices should mirror essentially the most present state to keep away from
conflicting actions.
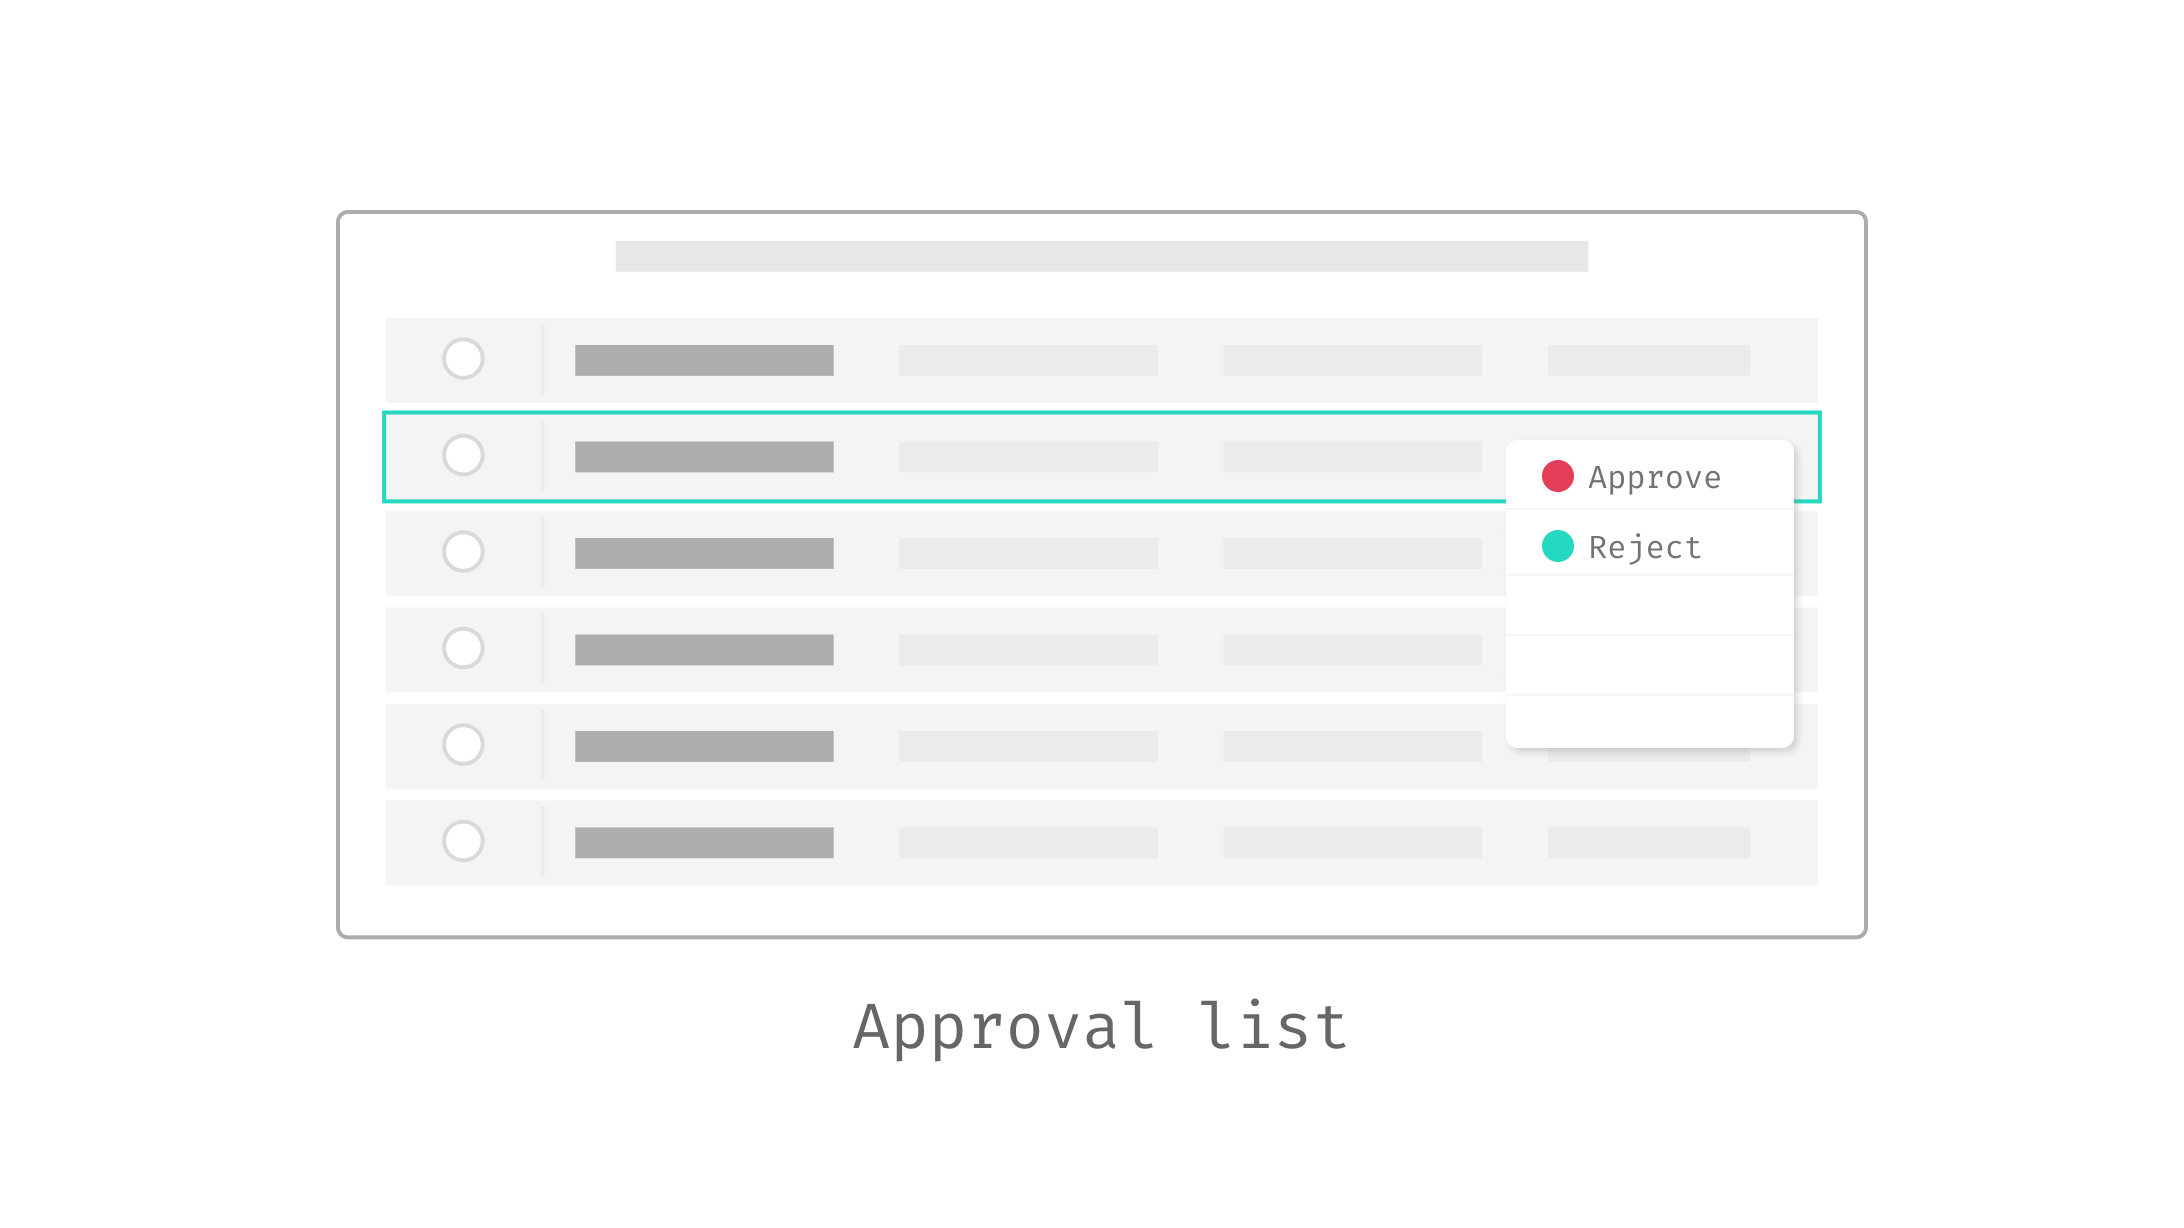
Determine 10: The approval listing that require in-time
states
To deal with this, a service name is initiated every time the context
menu is activated. This service fetches the most recent standing of the merchandise,
making certain that the dropdown is constructed with essentially the most correct and
present choices out there at that second. Because of this, these requests
can’t be made in parallel with different data-fetching actions for the reason that
dropdown’s contents rely solely on the real-time standing fetched from
the server.
Fallback Markup
Specify fallback shows within the web page markup
This sample leverages abstractions offered by frameworks or libraries
to deal with the info retrieval course of, together with managing states like
loading, success, and error, behind the scenes. It permits builders to
deal with the construction and presentation of information of their purposes,
selling cleaner and extra maintainable code.
Let’s take one other have a look at the Mates element within the above
part. It has to take care of three totally different states and register the
callback in useEffect, setting the flag accurately on the proper time,
prepare the totally different UI for various states:
const Mates = ({ id }: { id: string }) => {
  //...
  const {
    loading,
    error,
    information: associates,
    fetch: fetchFriends,
  } = useService(`/customers/${id}/associates`);

  useEffect(() => {
    fetchFriends();
  }, []);

  if (loading) {
    // present loading indicator
  }

  if (error) {
    // present error message element
  }

  // present the acutal buddy listing
};
You’ll discover that inside a element we’ve got to take care of
totally different states, even we extract customized Hook to cut back the noise in a
element, we nonetheless have to pay good consideration to dealing with
loading and error inside a element. These
boilerplate code could be cumbersome and distracting, usually cluttering the
readability of our codebase.
If we consider declarative API, like how we construct our UI with JSX, the
code could be written within the following method that means that you can deal with
what the element is doing – not how you can do it:
<WhenError fallback={<ErrorMessage />}>
  <WhenInProgress fallback={<Loading />}>
    <Mates />
  </WhenInProgress>
</WhenError>
Within the above code snippet, the intention is straightforward and clear: when an
error happens, ErrorMessage is displayed. Whereas the operation is in
progress, Loading is proven. As soon as the operation completes with out errors,
the Mates element is rendered.
And the code snippet above is fairly similiar to what already be
applied in just a few libraries (together with React and Vue.js). For instance,
the brand new Suspense in React permits builders to extra successfully handle
asynchronous operations inside their parts, enhancing the dealing with of
loading states, error states, and the orchestration of concurrent
duties.
Implementing Fallback Markup in React with Suspense
Suspense in React is a mechanism for effectively dealing with
asynchronous operations, comparable to information fetching or useful resource loading, in a
declarative method. By wrapping parts in a Suspense boundary,
builders can specify fallback content material to show whereas ready for the
element’s information dependencies to be fulfilled, streamlining the consumer
expertise throughout loading states.
Whereas with the Suspense API, within the Mates you describe what you
wish to get after which render:
import useSWR from "swr";
import { get } from "../utils.ts";

operate Mates({ id }: { id: string }) {
  const { information: customers } = useSWR("/api/profile", () => get<Person[]>(`/customers/${id}/associates`), {
    suspense: true,
  });

  return (
    <div>
      <h2>Mates</h2>
      <div>
        {associates.map((consumer) => (
          <Pal consumer={consumer} key={consumer.id} />
        ))}
      </div>
    </div>
  );
}
And declaratively whenever you use the Mates, you utilize
Suspense boundary to wrap across the Mates
element:
<Suspense fallback={<FriendsSkeleton />}>
  <Mates id={id} />
</Suspense>
Suspense manages the asynchronous loading of the
Mates element, exhibiting a FriendsSkeleton
placeholder till the element’s information dependencies are
resolved. This setup ensures that the consumer interface stays responsive
and informative throughout information fetching, enhancing the general consumer
expertise.
Use the sample in Vue.js
It is price noting that Vue.js can be exploring an analogous
experimental sample, the place you possibly can make use of Fallback Markup utilizing:
<Suspense>
  <template #default>
    <AsyncComponent />
  </template>
  <template #fallback>
    Loading...
  </template>
</Suspense>
Upon the primary render, <Suspense> makes an attempt to render
its default content material behind the scenes. Ought to it encounter any
asynchronous dependencies throughout this part, it transitions right into a
pending state, the place the fallback content material is displayed as an alternative. As soon as all
the asynchronous dependencies are efficiently loaded,
<Suspense> strikes to a resolved state, and the content material
initially supposed for show (the default slot content material) is
rendered.
Deciding Placement for the Loading Element
You might marvel the place to position the FriendsSkeleton
element and who ought to handle it. Usually, with out utilizing Fallback
Markup, this determination is simple and dealt with immediately inside the
element that manages the info fetching:
const Mates = ({ id }: { id: string }) => {
  // Information fetching logic right here...

  if (loading) {
    // Show loading indicator
  }

  if (error) {
    // Show error message element
  }

  // Render the precise buddy listing
};
On this setup, the logic for displaying loading indicators or error
messages is of course located inside the Mates element. Nonetheless,
adopting Fallback Markup shifts this accountability to the
element’s client:
<Suspense fallback={<FriendsSkeleton />}>
  <Mates id={id} />
</Suspense>
In real-world purposes, the optimum method to dealing with loading
experiences relies upon considerably on the specified consumer interplay and
the construction of the appliance. As an illustration, a hierarchical loading
method the place a mother or father element ceases to indicate a loading indicator
whereas its kids parts proceed can disrupt the consumer expertise.
Thus, it is essential to fastidiously contemplate at what degree inside the
element hierarchy the loading indicators or skeleton placeholders
must be displayed.
Consider Mates and FriendsSkeleton as two
distinct element states—one representing the presence of information, and the
different, the absence. This idea is considerably analogous to utilizing a Speical Case sample in object-oriented
programming, the place FriendsSkeleton serves because the ‘null’
state dealing with for the Mates element.
The secret’s to find out the granularity with which you wish to
show loading indicators and to take care of consistency in these
choices throughout your software. Doing so helps obtain a smoother and
extra predictable consumer expertise.
When to make use of it
Utilizing Fallback Markup in your UI simplifies code by enhancing its readability
and maintainability. This sample is especially efficient when using
commonplace parts for varied states comparable to loading, errors, skeletons, and
empty views throughout your software. It reduces redundancy and cleans up
boilerplate code, permitting parts to focus solely on rendering and
performance.
Fallback Markup, comparable to React’s Suspense, standardizes the dealing with of
asynchronous loading, making certain a constant consumer expertise. It additionally improves
software efficiency by optimizing useful resource loading and rendering, which is
particularly useful in complicated purposes with deep element bushes.
Nonetheless, the effectiveness of Fallback Markup will depend on the capabilities of
the framework you’re utilizing. For instance, React’s implementation of Suspense for
information fetching nonetheless requires third-party libraries, and Vue’s help for
comparable options is experimental. Furthermore, whereas Fallback Markup can scale back
complexity in managing state throughout parts, it could introduce overhead in
easier purposes the place managing state immediately inside parts might
suffice. Moreover, this sample might restrict detailed management over loading and
error states—conditions the place totally different error sorts want distinct dealing with would possibly
not be as simply managed with a generic fallback method.
Introducing UserDetailCard element
Let’s say we’d like a characteristic that when customers hover on high of a Pal,
we present a popup to allow them to see extra particulars about that consumer.
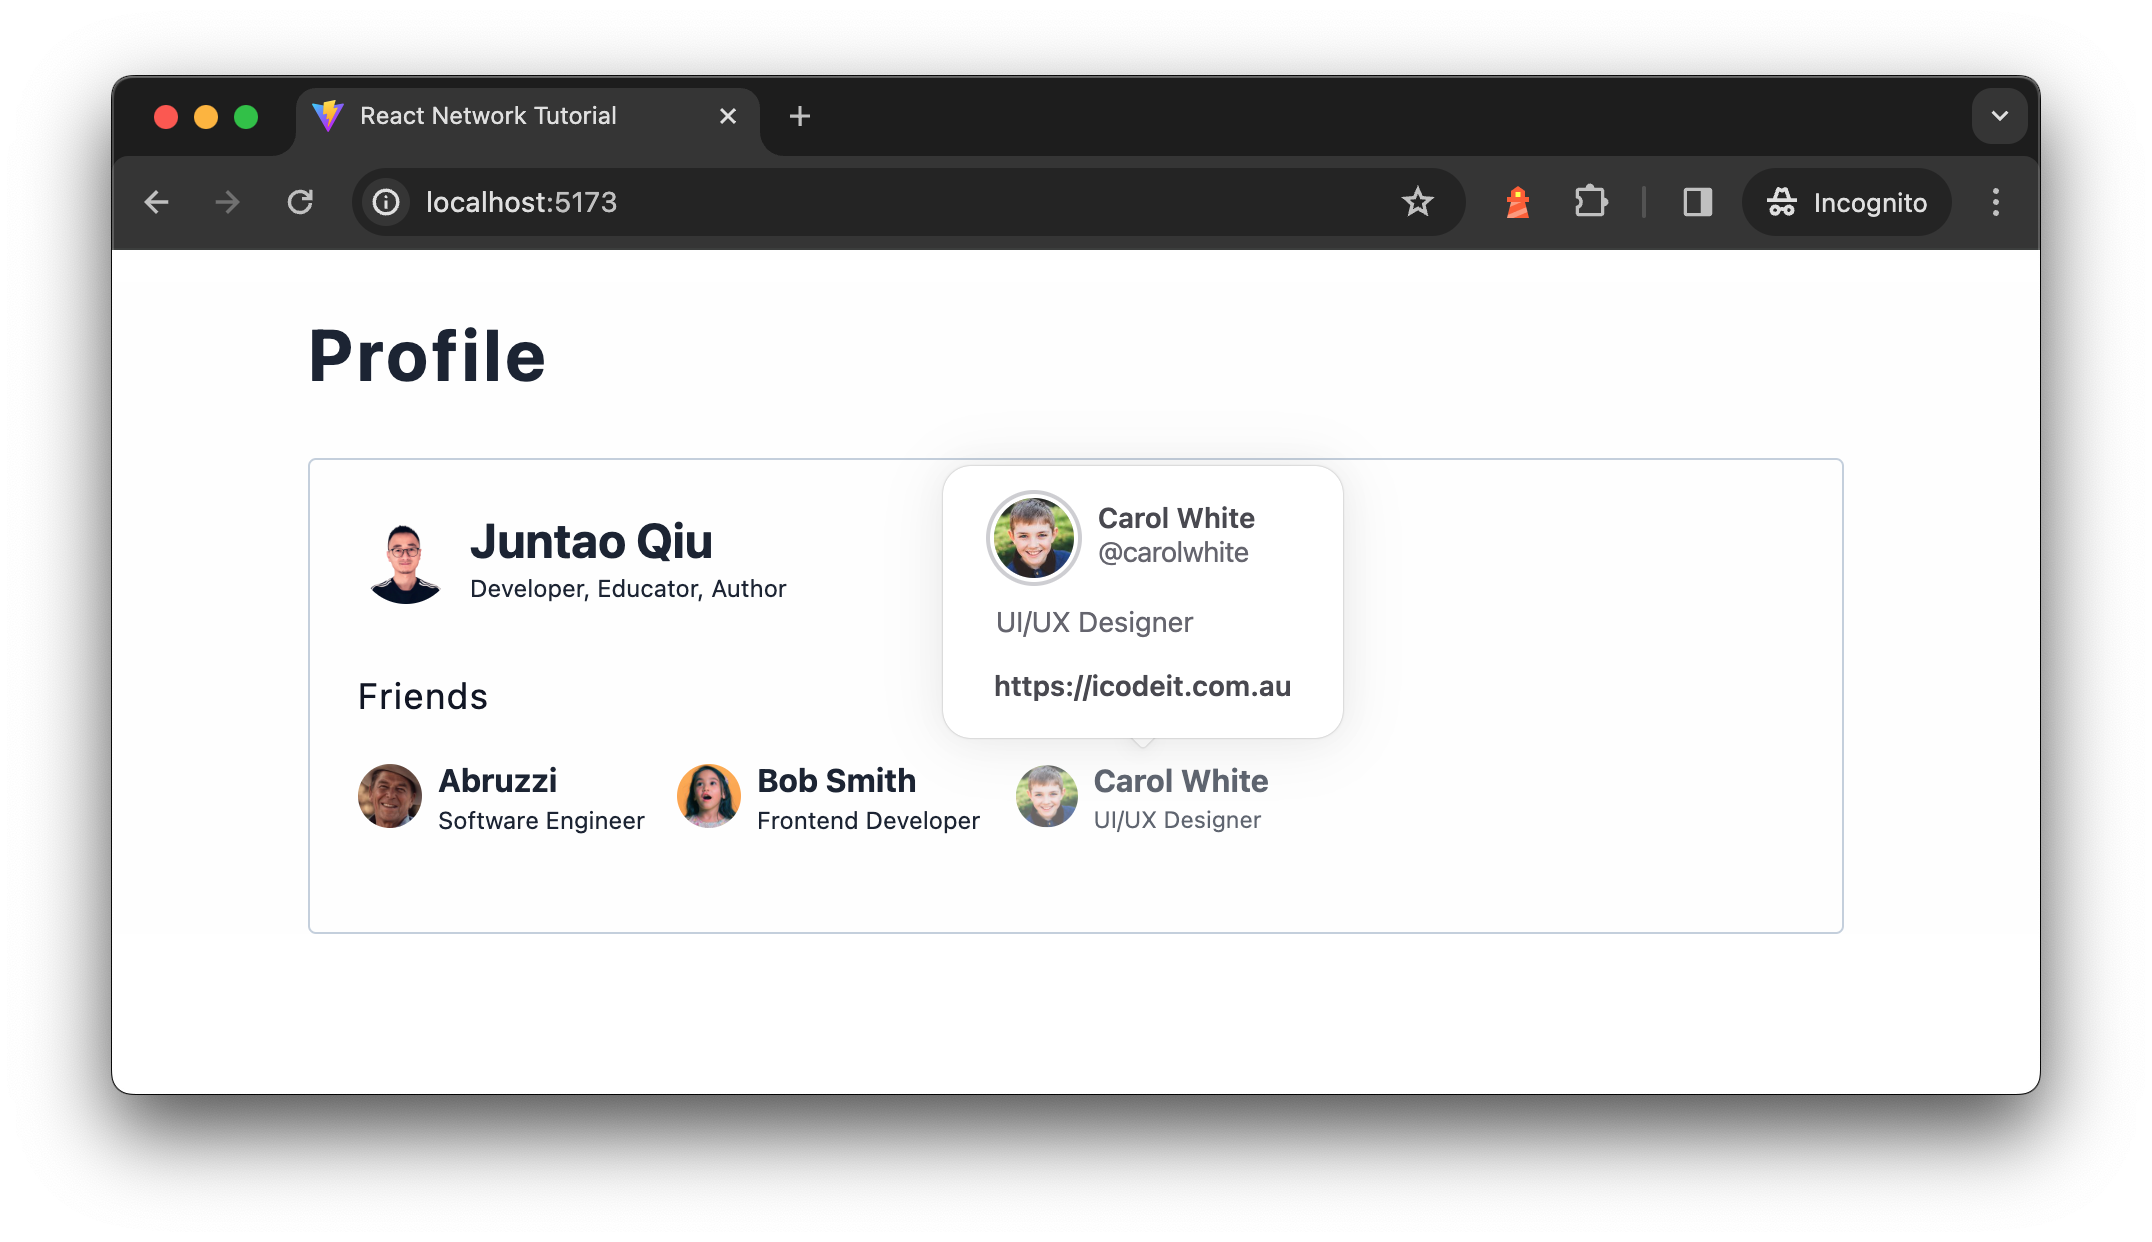
Determine 11: Exhibiting consumer element
card element when hover
When the popup exhibits up, we have to ship one other service name to get
the consumer particulars (like their homepage and variety of connections, and so on.). We
might want to replace the Pal element ((the one we use to
render every merchandise within the Mates listing) ) to one thing just like the
following.
import { Popover, PopoverContent, PopoverTrigger } from "@nextui-org/react";
import { UserBrief } from "./consumer.tsx";

import UserDetailCard from "./user-detail-card.tsx";

export const Pal = ({ consumer }: { consumer: Person }) => {
  return (
    <Popover placement="backside" showArrow offset={10}>
      <PopoverTrigger>
        <button>
          <UserBrief consumer={consumer} />
        </button>
      </PopoverTrigger>
      <PopoverContent>
        <UserDetailCard id={consumer.id} />
      </PopoverContent>
    </Popover>
  );
};
The UserDetailCard, is fairly just like the
Profile element, it sends a request to load information after which
renders the consequence as soon as it will get the response.
export operate UserDetailCard({ id }: { id: string }) {
  const { loading, error, element } = useUserDetail(id);

  if (loading || !element) {
    return <div>Loading...</div>;
  }

  return (
    <div>
    {/* render the consumer element*/}
    </div>
  );
}
We’re utilizing Popover and the supporting parts from
nextui, which offers a number of stunning and out-of-box
parts for constructing fashionable UI. The one downside right here, nonetheless, is that
the package deal itself is comparatively large, additionally not everybody makes use of the characteristic
(hover and present particulars), so loading that additional massive package deal for everybody
isn’t ultimate – it might be higher to load the UserDetailCard
on demand – at any time when it’s required.
Determine 12: Element construction with
UserDetailCard
Code Splitting
Divide code into separate modules and dynamically load them as
wanted.
Code Splitting addresses the problem of huge bundle sizes in net
purposes by dividing the bundle into smaller chunks which are loaded as
wanted, relatively than . This improves preliminary load time and
efficiency, particularly essential for big purposes or these with
many routes.
This optimization is usually carried out at construct time, the place complicated
or sizable modules are segregated into distinct bundles. These are then
dynamically loaded, both in response to consumer interactions or
preemptively, in a way that doesn’t hinder the vital rendering path
of the appliance.
Leveraging the Dynamic Import Operator
The dynamic import operator in JavaScript streamlines the method of
loading modules. Although it could resemble a operate name in your code,
comparable to import("./user-detail-card.tsx"), it is essential to
acknowledge that import is definitely a key phrase, not a
operate. This operator allows the asynchronous and dynamic loading of
JavaScript modules.
With dynamic import, you possibly can load a module on demand. For instance, we
solely load a module when a button is clicked:
button.addEventListener("click on", (e) => {

  import("/modules/some-useful-module.js")
    .then((module) => {
      module.doSomethingInteresting();
    })
    .catch(error => {
      console.error("Did not load the module:", error);
    });
});
The module just isn’t loaded in the course of the preliminary web page load. As a substitute, the
import() name is positioned inside an occasion listener so it solely
be loaded when, and if, the consumer interacts with that button.
You should use dynamic import operator in React and libraries like
Vue.js. React simplifies the code splitting and lazy load by the
React.lazy and Suspense APIs. By wrapping the
import assertion with React.lazy, and subsequently wrapping
the element, as an illustration, UserDetailCard, with
Suspense, React defers the element rendering till the
required module is loaded. Throughout this loading part, a fallback UI is
offered, seamlessly transitioning to the precise element upon load
completion.
import React, { Suspense } from "react";
import { Popover, PopoverContent, PopoverTrigger } from "@nextui-org/react";
import { UserBrief } from "./consumer.tsx";

const UserDetailCard = React.lazy(() => import("./user-detail-card.tsx"));

export const Pal = ({ consumer }: { consumer: Person }) => {
  return (
    <Popover placement="backside" showArrow offset={10}>
      <PopoverTrigger>
        <button>
          <UserBrief consumer={consumer} />
        </button>
      </PopoverTrigger>
      <PopoverContent>
        <Suspense fallback={<div>Loading...</div>}>
          <UserDetailCard id={consumer.id} />
        </Suspense>
      </PopoverContent>
    </Popover>
  );
};
This snippet defines a Pal element displaying consumer
particulars inside a popover from Subsequent UI, which seems upon interplay.
It leverages React.lazy for code splitting, loading the
UserDetailCard element solely when wanted. This
lazy-loading, mixed with Suspense, enhances efficiency
by splitting the bundle and exhibiting a fallback in the course of the load.
If we visualize the above code, it renders within the following
sequence.
Determine 13: Dynamic load element
when wanted
Word that when the consumer hovers and we obtain
the JavaScript bundle, there shall be some additional time for the browser to
parse the JavaScript. As soon as that a part of the work is completed, we will get the
consumer particulars by calling /customers/<id>/particulars API.
Finally, we will use that information to render the content material of the popup
UserDetailCard.
When to make use of it
Splitting out additional bundles and loading them on demand is a viable
technique, nevertheless it’s essential to think about the way you implement it. Requesting
and processing an extra bundle can certainly save bandwidth and lets
customers solely load what they want. Nonetheless, this method may additionally gradual
down the consumer expertise in sure eventualities. For instance, if a consumer
hovers over a button that triggers a bundle load, it might take just a few
seconds to load, parse, and execute the JavaScript obligatory for
rendering. Though this delay happens solely in the course of the first
interplay, it may not present the best expertise.
To enhance perceived efficiency, successfully utilizing React Suspense to
show a skeleton or one other loading indicator can assist make the
loading course of appear faster. Moreover, if the separate bundle is
not considerably massive, integrating it into the primary bundle might be a
extra simple and cost-effective method. This fashion, when a consumer
hovers over parts like UserBrief, the response could be
quick, enhancing the consumer interplay with out the necessity for separate
loading steps.
Lazy load in different frontend libraries
Once more, this sample is broadly adopted in different frontend libraries as
properly. For instance, you should utilize defineAsyncComponent in Vue.js to
obtain the samiliar consequence – solely load a element whenever you want it to
render:
<template>
  <Popover placement="backside" show-arrow offset="10">
  <!-- the remainder of the template -->
  </Popover>
</template>

<script>
import { defineAsyncComponent } from 'vue';
import Popover from 'path-to-popover-component';
import UserBrief from './UserBrief.vue';

const UserDetailCard = defineAsyncComponent(() => import('./UserDetailCard.vue'));

// rendering logic
</script>
The operate defineAsyncComponent defines an async
element which is lazy loaded solely when it’s rendered similar to the
React.lazy.
As you might need already seen the seen, we’re working right into a Request Waterfall right here once more: we load the
JavaScript bundle first, after which when it execute it sequentially name
consumer particulars API, which makes some additional ready time. We might request
the JavaScript bundle and the community request parallely. Which means,
at any time when a Pal element is hovered, we will set off a
community request (for the info to render the consumer particulars) and cache the
consequence, in order that by the point when the bundle is downloaded, we will use
the info to render the element instantly.