


On this article, we are going to stroll you thru the method of implementing fantastic grained entry management for the information governance framework throughout the Cloudera platform. It will permit an information workplace to implement entry insurance policies over metadata administration property like tags or classifications, enterprise glossaries, and knowledge catalog entities, laying the muse for complete knowledge entry management.
In a superb knowledge governance technique, it is very important outline roles that permit the enterprise to restrict the extent of entry that customers can need to their strategic knowledge property. Historically we see three primary roles in an information governance workplace:
- Information steward: Defines the enterprise guidelines for knowledge use in keeping with company steering and knowledge governance necessities.
- Information curator: Assigns and enforces knowledge classification in keeping with the foundations outlined by the information stewards in order that knowledge property are searchable by the information client.
- Information client: Derives insights and worth from knowledge property and is eager to grasp the standard and consistency of tags and phrases utilized to the information.
Throughout the Cloudera platform, whether or not deployed on premises or utilizing any of the main public cloud suppliers, the Cloudera Shared Information Expertise (SDX) ensures consistency of all issues knowledge safety and governance. SDX is a basic a part of any deployment and depends on two key open supply initiatives to offer its knowledge administration performance: Apache Atlas supplies a scalable and extensible set of core governance companies, whereas Apache Ranger permits, screens, and manages complete safety for each knowledge and metadata.
On this article we are going to clarify how you can implement a fantastic grained entry management technique utilizing Apache Ranger by creating safety insurance policies over the metadata administration property saved in Apache Atlas.
Case Introduction
On this article we are going to take the instance of an information governance workplace that wishes to manage entry to metadata objects within the firm’s central knowledge repository. This enables the group to adjust to authorities rules and inner safety insurance policies. For this activity, the information governance group began by trying on the finance enterprise unit, defining roles and duties for various kinds of customers within the group.
On this instance, there are three completely different customers that may permit us to indicate the completely different ranges of permissions that may be assigned to Apache Atlas objects by means of Apache Ranger insurance policies to implement an information governance technique with the Cloudera platform:
- admin is our knowledge steward from the information governance workplace
- etl_user is our knowledge curator from the finance group
- joe_analyst is our knowledge client from the finance group
Notice that it could be simply as simple to create extra roles and ranges of entry, if required. As you will notice as we work by means of the instance, the framework offered by Apache Atlas and Apache Ranger is extraordinarily versatile and customizable.
First, a set of preliminary metadata objects are created by the information steward. These will permit the finance group to seek for related property as a part of their day-to-day actions:
- Classifications (or “tags”) like “PII”, “SENSITIVE”, “EXPIRES_ON”, “DATA QUALITY” and many others.
- Glossaries and phrases created for the three primary enterprise items: “Finance,” “Insurance coverage,” and “Automotive.”
- A enterprise metadata assortment known as “Challenge.”
NOTE: The creation of the enterprise metadata attributes just isn’t included within the weblog however the steps might be adopted right here.
Then, with the intention to management the entry to the information property associated to the finance enterprise unit, a set of insurance policies must be carried out with the next circumstances:
The finance knowledge curator <etl_user> ought to solely be allowed to:
- Create/learn classifications that begin with the phrase “finance.”
- Learn/replace entities which are labeled with any tag that begins with the phrase “finance,” and in addition any entities associated to the “worldwidebank” mission. The consumer must also be capable of add labels and enterprise metadata to these entities.
- Add/replace/take away classifications of the entities with the earlier specs.
- Create/learn/replace the glossaries and glossary phrases associated to “finance.”
The finance knowledge client <joe_analyst> ought to solely be allowed to:
- View and entry cClassifications associated to “finance” to look property.
- View and entry entities which are labeled with tags associated to “finance.”
- View and entry the “finance” glossary.
Within the following part, the method for implementing these insurance policies can be defined intimately.
Implementation of fine-grained entry controls (step-by-step)
As a way to meet the enterprise wants outlined above, we are going to display how entry insurance policies in Apache Ranger might be configured to safe and management metadata property in Apache Atlas. For this objective we used a public AMI picture to arrange a Cloudera Information Platform setting with all SDX elements. The method of establishing the setting is defined in this text.
1. Authorization for Classification Varieties
Classifications are a part of the core of Apache Atlas. They’re one of many mechanisms offered to assist organizations discover, arrange, and share their understanding of the information property that drive enterprise processes. Crucially, classifications can “propagate” between entities in keeping with lineage relationships between knowledge property. See this web page for extra particulars on propagation.
1.1 Information Steward – admin consumer
To regulate entry to classifications, our admin consumer, within the function of information steward, should carry out the next steps:
- Entry the Ranger console.
- Entry Atlas repository to create and handle insurance policies.
- Create the suitable insurance policies for the information curator and the information client of the finance enterprise unit.
First, entry the Atlas Ranger insurance policies repository from the Ranger admin UI
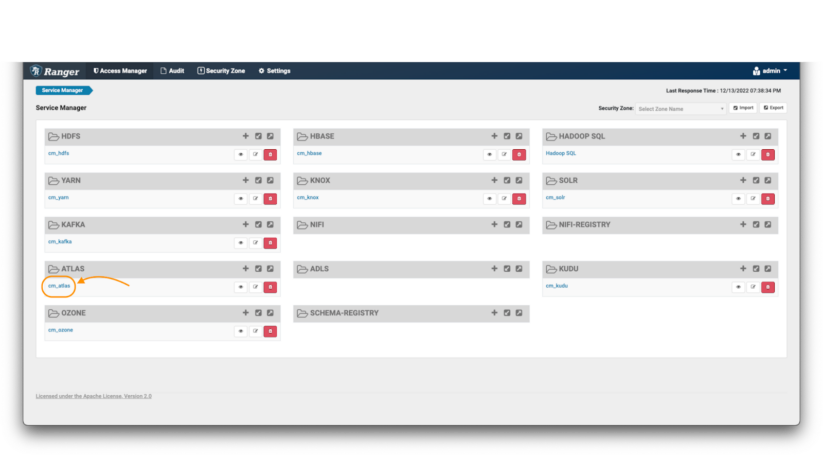
Picture 1 – Ranger primary web page
Within the Atlas coverage repository:
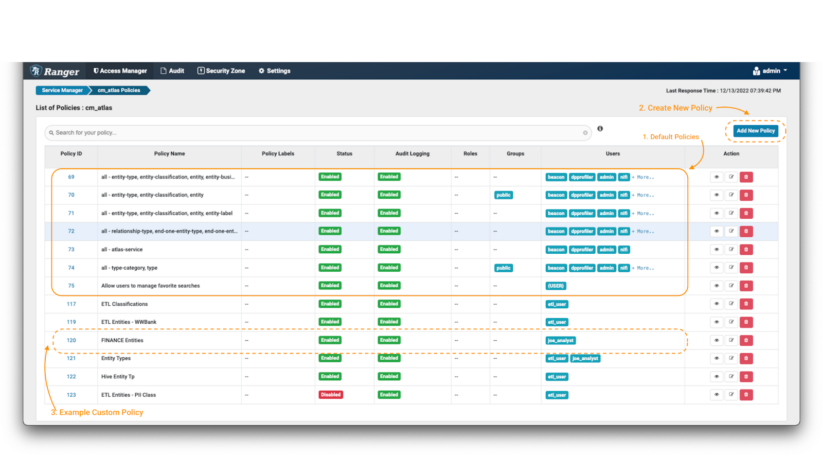
Picture 2 – Atlas insurance policies
The very first thing you will notice are the default Atlas insurance policies (be aware 1). Apache Ranger permits specification of entry insurance policies as each “permit” guidelines and “deny” guidelines. Nonetheless, it’s a really useful good follow in all safety contexts to use the “precept of least privilege”: i.e., deny entry by default, and solely permit entry on a selective foundation. It is a far more safe method than permitting entry to everybody, and solely denying or excluding entry selectively. Due to this fact, as a primary step, it is best to confirm that the default insurance policies don’t grant blanket entry to the customers we’re in search of to limit on this instance situation.
Then, you’ll be able to create the brand new insurance policies (eg. take away the general public entry of the default insurance policies by making a deny coverage; be aware 2) and at last you will notice that the newly created insurance policies will seem on the backside of the part (be aware 3).
After clicking the “Add New Coverage” button:
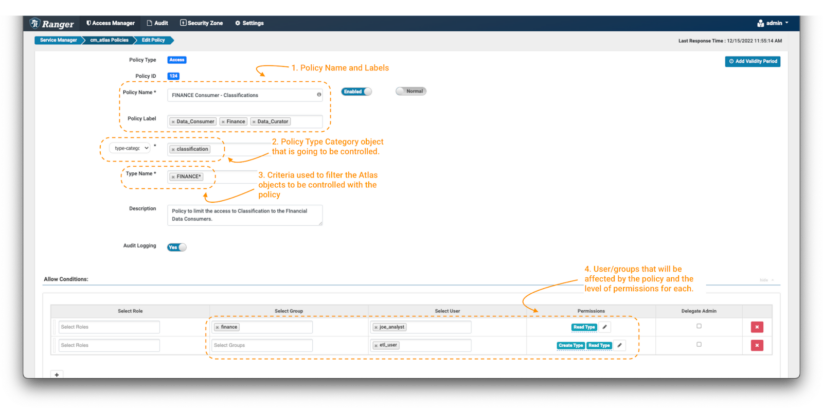
Picture 3 – Create coverage over finance classification
- First, outline a coverage identify and, if desired, some coverage labels (be aware 1). These should not have a “useful” impact on the coverage, however are an necessary a part of retaining your safety insurance policies manageable as your setting grows over time. It’s regular to undertake a naming conference in your insurance policies, which can embody short-hand descriptions of the consumer teams and/or property to which the coverage applies, and a sign of its intent. On this case we have now chosen the coverage identify “FINANCE Client – Classifications,” and used the labels “Finance.” “Information Governance,” and “Information Curator.”
- Subsequent, outline the kind of object on which you need to apply the coverage. On this case we are going to choose “type-category” and fill with “Classifications” (be aware 2).
- Now, you want to outline the standards used to filter the Apache Atlas objects to be affected by the coverage. You need to use wildcard notations like “*”. To restrict the information client to solely seek for classifications beginning with the work finance, use FINANCE* (be aware 3).
- Lastly, you want to outline the permissions that you simply need to grant on the coverage and the teams and customers which are going to be managed by the coverage. On this case, apply the Learn Kind permission to group: finance and consumer: joe_analyst and Create Kind & Learn Kind permission to consumer: etl_user. (be aware 4)
Now, as a result of they’ve the Create Kind permission for classifications matching FINANCE*, the information curator etl_user can create a brand new classification tag known as “FINANCE_WW” and apply this tag to different entities. This is able to be helpful if a tag-based entry coverage has been outlined elsewhere to offer entry to sure knowledge property.
1.2 Information Curator – etl_user consumer
We will now display how the classification coverage is being enforced over etl_user. This consumer is just allowed to see classifications that begin with the phrase finance, however he can even create some extra ones for the completely different groups underneath that division.
etl_user can create a brand new classification tag known as FINANCE_WW underneath a dad or mum classification tag FINANCE_BU.
To create a classification in Atlas:
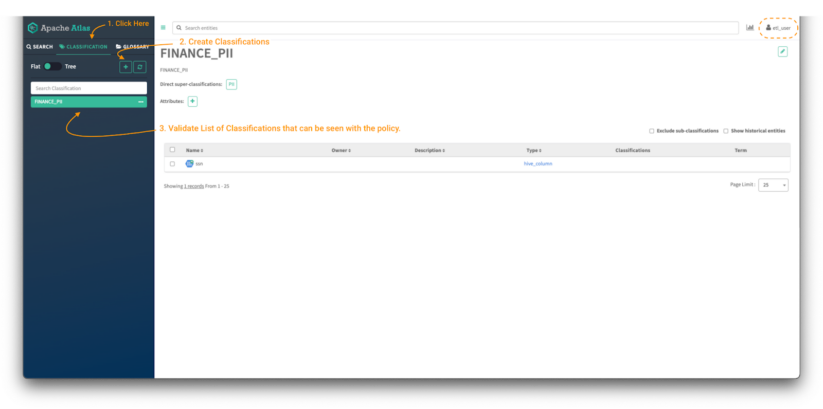
Picture 4 – Atlas classifications tab
- First, click on on the classification panel button (be aware 1) to have the ability to see the present tags that the consumer has entry to. It is possible for you to to see the property which are tagged with the chosen classification. (be aware 3)
- Then, click on on the “+” button to create a brand new classification. (be aware 2)
A brand new window open, requiring numerous particulars to create the brand new classification.
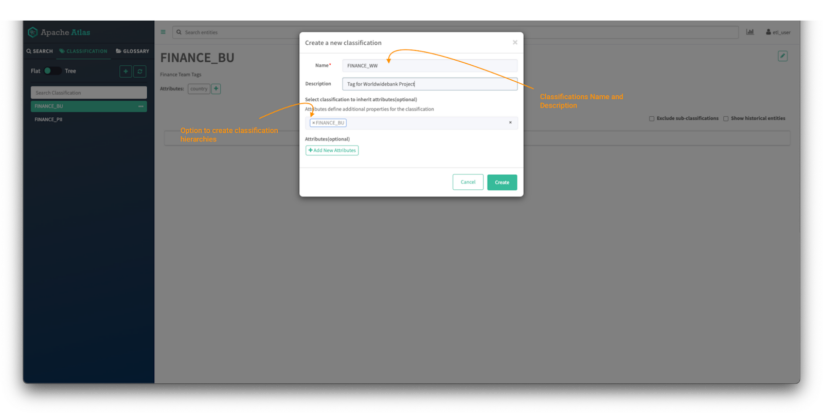
Picture 5 – Atlas classifications creation tab
- First, present the identify of the classification, on this case FINANCE_WW, and supply an outline, in order that colleagues will perceive the way it ought to be used.
- Classifications can have hierarchies and people inherit attributes from the dad or mum classification. To create a hierarchy, kind the identify of the dad or mum tag, on this case FINANCE_BU.
- Extra customized attributes will also be added to later be used on attribute-based entry management (ABAC) insurance policies. This falls exterior of the scope of this weblog publish however a tutorial on the topic might be discovered right here.
- (Optionally available) For this instance, you’ll be able to create an attribute known as “nation,” which is able to merely assist to arrange property. For comfort you may make this attribute a “string” (a free textual content) kind, though in a stay system you’d in all probability need to outline an enumeration in order that customers’ inputs are restricted to a sound set of values.
After clicking the button “create” the newly created classification is proven within the panel:
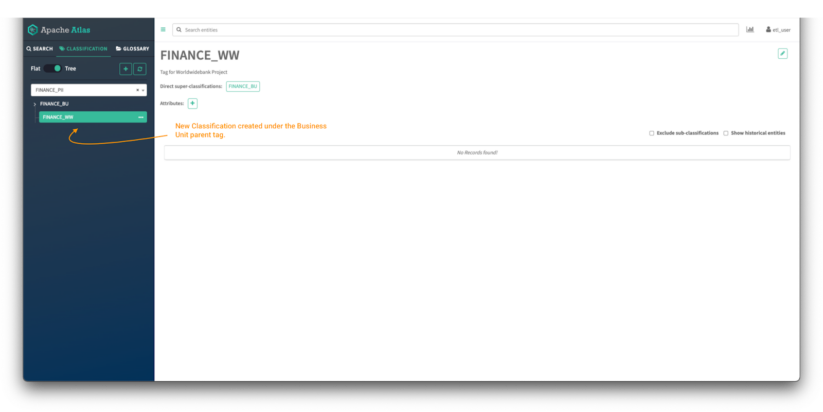
Picture 6 – Atlas classifications tree
Now you’ll be able to click on on the toggle button to see the tags in tree mode and it is possible for you to to see the dad or mum/baby relationship between each tags.
Click on on the classification to view all its particulars: dad or mum tags, attributes, and property presently tagged with the classification.
1.3 Information Client – joe_analyst consumer
The final step on the Classification authorization course of is to validate from the information client function that the controls are in place and the insurance policies are utilized accurately.
After efficiently logging in with consumer joe_analyst:
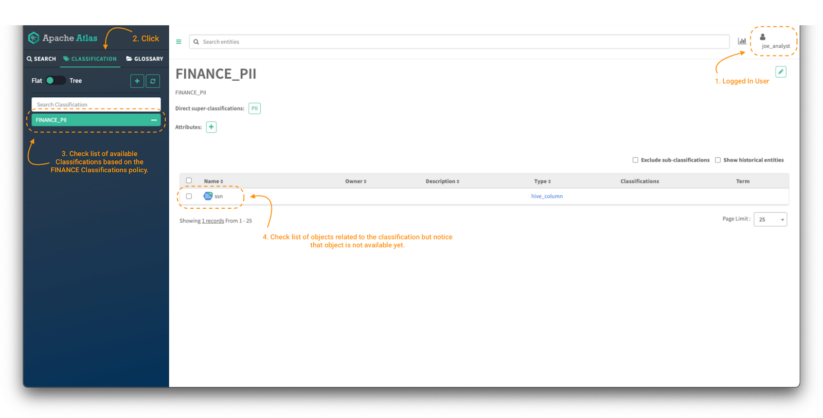
Picture 7 – Atlas classifications for finance knowledge client
To validate that the coverage is utilized and that solely classifications beginning with the phrase FINANCE might be accessed primarily based on the extent of permissions outlined within the coverage, click on on the Classifications tab (be aware 2) and examine the listing out there. (be aware 3)
Now, to have the ability to entry the content material of the entities (be aware 4), it’s required to present entry to the Atlas Entity Kind class and to the precise entities with the corresponding degree of permissions primarily based on our enterprise necessities. The subsequent part will cowl simply that.
2. Authorization for Entity Varieties, Labels and Enterprise Metadata
On this part, we are going to clarify how you can shield extra varieties of objects that exist in Atlas, that are necessary inside an information governance technique; particularly, entities, labels, and enterprise metadata.
Entities in Apache Atlas are a particular occasion of a “kind” of factor: they’re the core metadata object that characterize knowledge property in your platform. For instance, think about you could have an information desk in your lakehouse, saved within the Iceberg desk format, known as “sales_q3.” This is able to be mirrored in Apache Atlas by an entity kind known as “ceberg desk,” and an entity named “sales_q3,” a specific occasion of that entity kind. There are lots of entity varieties configured by default within the Cloudera platform, and you’ll outline new ones as nicely. Entry to entity varieties, and particular entities, might be managed by means of Ranger insurance policies.
Labels are phrases or phrases (strings of characters) you could affiliate with an entity and reuse for different entities. They’re a lightweight manner so as to add info to an entity so yow will discover it simply and share your data concerning the entity with others.
Enterprise metadata are units of associated key-value pairs, outlined prematurely by admin customers (for instance, knowledge stewards). They’re so named as a result of they’re usually used to seize enterprise particulars that may assist arrange, search, and handle metadata entities. For instance, a steward from the advertising division can outline a set of attributes for a marketing campaign, and add these attributes to related metadata objects. In distinction, technical particulars about knowledge property are normally captured extra straight as attributes on entity cases. These are created and up to date by processes that monitor knowledge units within the knowledge lakehouse or warehouse, and aren’t sometimes custom-made in a given Cloudera setting.
With that context defined, we are going to transfer on to setting insurance policies to manage who can add, replace, or take away numerous metadata on entities. We will set fine-grained insurance policies individually for each labels and enterprise metadata, in addition to classifications. These insurance policies are outlined by the information steward, with the intention to management actions undertaken by knowledge curators and customers.
2.1 Information Steward – admin consumer
First, it’s necessary to make it possible for the customers have entry to the entity varieties within the system. It will permit them to filter their search when on the lookout for particular entities.
So as to take action, we have to create a coverage:
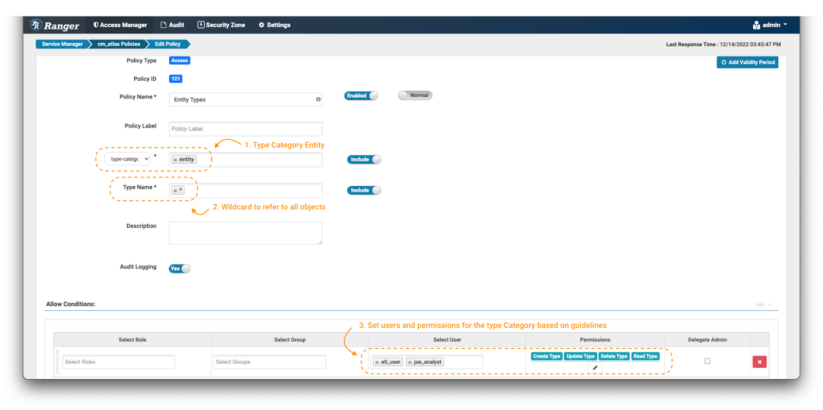
Picture 8 – Atlas entity kind insurance policies
Within the create coverage web page, outline the identify and labels as described earlier than. Then, choose the type-category “entity”(be aware 1). Use the wildcard notation (*) (be aware 2) to indicate all entity varieties, and grant all out there permissions to etl_user and joe_analyst.(be aware 3)
It will allow these customers to see all of the entity varieties within the system.
The subsequent step is to permit knowledge client joe_analyst to solely have learn entry on the entities which have the finance classification tags. It will restrict the objects that he’ll be capable of see on the platform.
To do that, we have to comply with the identical course of to create insurance policies as proven within the earlier part, however with some modifications on the coverage particulars:

Picture 9 – Instance Atlas finance entity insurance policies
- As at all times, identify (and label) the coverage to allow simple administration later.
- The primary necessary change is that the coverage is utilized on an “entity-type” and never in a “type-category.” Choose “entity-type” within the drop-down menu (be aware 2) and sort the wildcard to use it to all of the entity varieties.
- Some extra fields will seem within the type. Within the entity classification subject you’ll be able to specify tags that exist on the entities you need to management. In our case, we need to solely permit objects which are tagged with phrases that begin with “finance.” Use the expression FINANCE*. (be aware 3)
- Subsequent, filter the entities to be managed by means of the entity ID subject. On this train, we are going to use the wildcard (*) (be aware 4) and for the extra fields we are going to choose “none.” This button will replace the listing of permissions that may be enforced within the circumstances panel. (be aware 4)
- As an information client, we would like the joe_analyst consumer to have the ability to see the entities. To implement this, choose the Learn Entity permission. (be aware 5)
- Add a brand new situation for the information curator etl_user however this time embody permissions to change the tags appropriately, by including the Add Classification, Replace Classification & Take away Classification permissions to the precise consumer.
On this manner, entry to particular entities might be managed utilizing extra metadata objects like classification tags. Atlas supplies another metadata objects that can be utilized not solely to counterpoint the entities registered within the platform, but additionally to implement a governance technique over these objects, controlling who can entry and modify them. That is the case for the labels and the enterprise metadata.
If you wish to implement some management over who can add or take away labels:
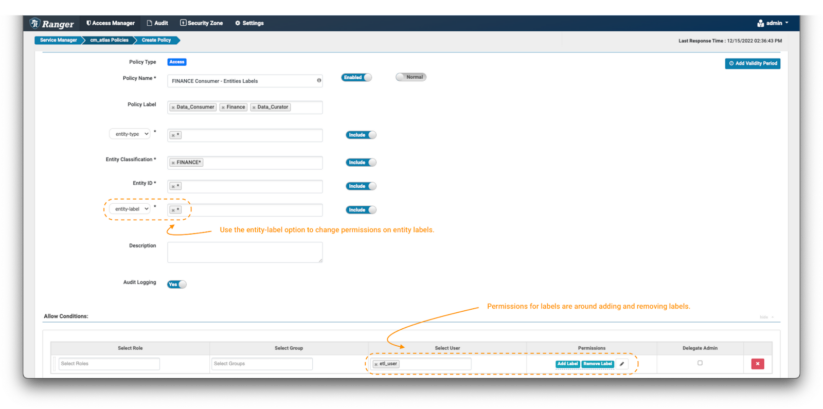
Picture 10 – Instance Atlas finance label coverage
- The one distinction between setting a coverage for labels versus the earlier examples is setting the extra fields filter to “entity-label” as proven within the picture and fill with the values of labels that need to be managed. On this case, we use the wildcard (*) to allow operations on any label on entities tagged with FINANCE* classifications.
- When the entity-label is chosen from the drop-down, the permissions listing can be up to date. Choose Add Label & Take away Label permission to grant the information curator the choice so as to add and take away labels from entities.
The identical precept might be utilized to manage the permissions over enterprise metadata:
Picture 11 – Instance Atlas finance enterprise metadata coverage
- On this case, one should set the extra fields filter to “entity-business-metadata” as proven within the picture and fill with the values of enterprise metadata attributes that need to be protected. On this instance, we use the wildcard (*) to allow operations on all enterprise metadata attributes on entities tagged with FINANCE* classifications.
- Whenever you allow the entity-business-metadata drop-down, the permissions listing can be up to date. Choose Replace Enterprise Metadata permission to grant the information curator the choice to change the enterprise metadata attributes of economic entities.
As a part of the fantastic grained entry management offered by Apache Ranger over Apache Atlas objects, one can create insurance policies that use an entity ID to specify the precise objects to be managed. Within the examples above we have now usually used the wildcard (*) to discuss with “all entities;” beneath, we are going to present a extra focused use-case.
On this situation, we need to create a coverage pertaining to knowledge tables that are a part of a particular mission, named “World Vast Financial institution.” As an ordinary, the mission house owners required that each one the tables are saved in a database known as “worldwidebank.”
To satisfy this requirement, we will use one of many entity varieties pre-configured in Cloudera’s distributions of Apache Atlas, particularly “hive_table”. For this entity kind, identifiers at all times start with the identify of the database to which the desk belongs. We will leverage that, utilizing Ranger expressions to filter all of the entities that belong to the “World Vast Financial institution” mission.
To create a coverage to guard the worldwidebank entities:
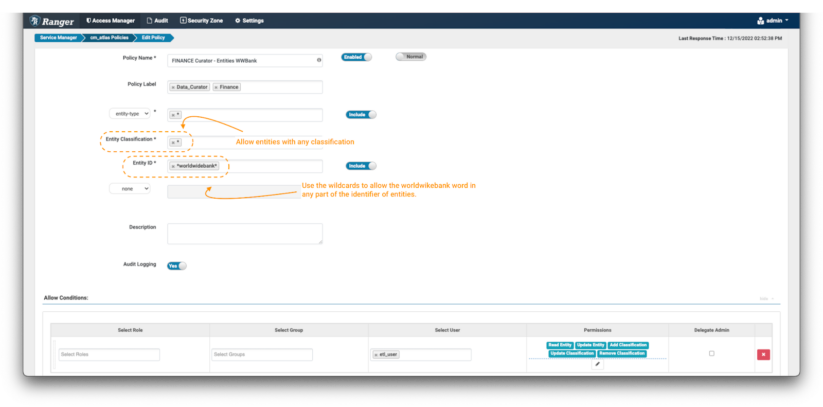
Picture 12 – Instance Atlas Worldwide Financial institution entity coverage
- Create a brand new coverage, however this time don’t specify any entity classification, use the wildcard “*” expression.
- Within the entity ID subject use the expression: *worldwidebank*
- Within the Situations, choose the permissions Learn Entity, Replace Entity, Add Classification, Replace Classification & Take away Classification to the information curator etl_user to have the ability to see the small print of those entities and enrich/modify and tag them as wanted.
2.2 Information Curator – etl_user consumer
As a way to permit finance knowledge client joe_analyst to make use of and entry the worldwidebank mission entities, the information curator etl_user should tag the entities with the permitted classifications and add the required labels and enterprise metadata attributes.
Login to Atlas and comply with the method to tag the suitable entities:
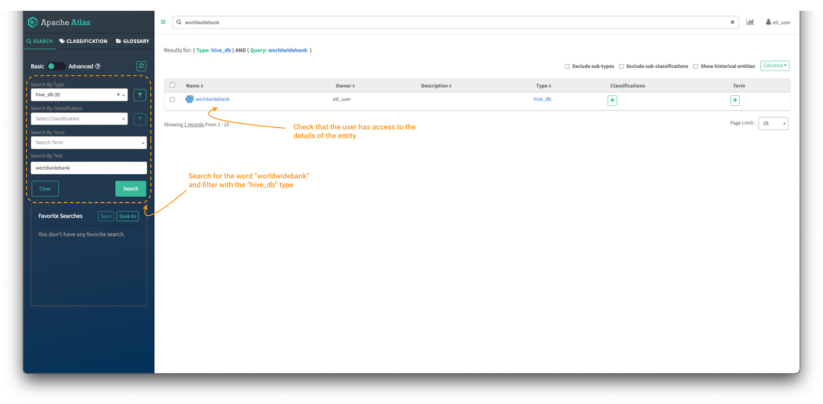
Picture 13 – Information curator entity search
- First, seek for the worldwidebank property utilizing the search bar. You may as well use the “search by kind” filter on the left panel to restrict the search to the “hive_db” entity kind.
- As knowledge curator, it is best to be capable of see the entity and be allowed to entry the small print of the worldwidebank database entity. It ought to have a clickable hyperlink to the entity object
- Click on on the entity object to see its particulars.
After clicking the entity identify, the entity particulars web page is proven:
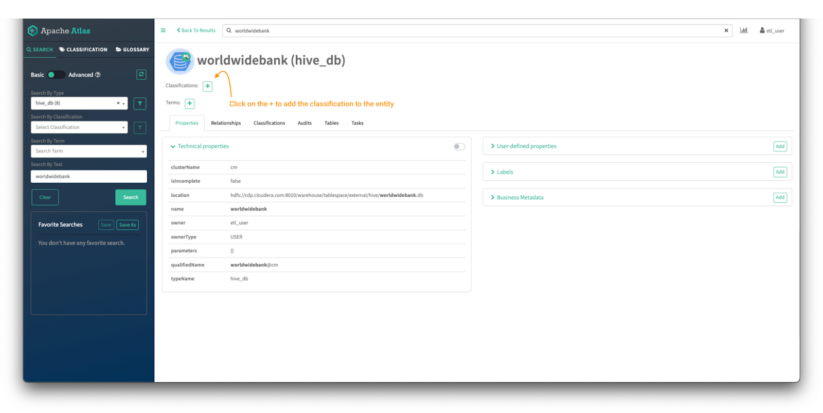
Picture 14 – Worldwide Financial institution database entity element
Within the high of the display screen, you’ll be able to see the classifications assigned to the entity. On this case there aren’t any tags assigned. We are going to assign one by clicking on the “+” signal.
Within the “Add Classification” display screen:
Picture 15 – Worldwide Financial institution database tag course of
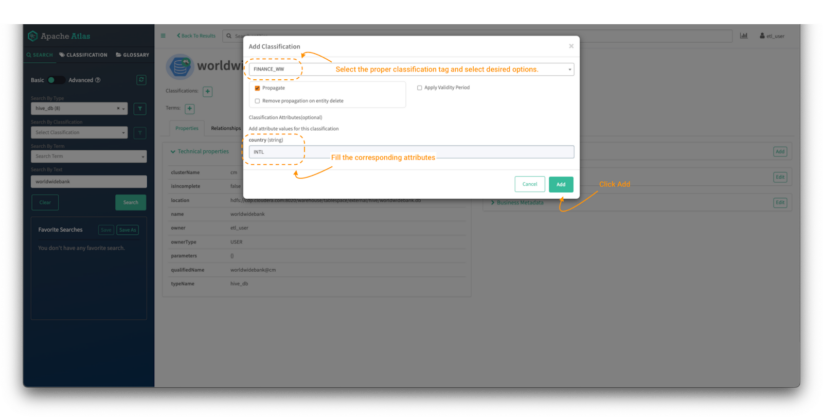
- Seek for the FINANCE_WW tag and choose it.
- Then fill the suitable attributes if the classification tag has any. (Optionally available in Picture 5, within the 1.2 Information Curator – etl_user consumer part above.)
- Click on on “add.”
That may tag an entity with the chosen classification.
Now, enrich the worldwidebank hive_db entity with a brand new label and a brand new enterprise metadata attribute known as “Challenge.”
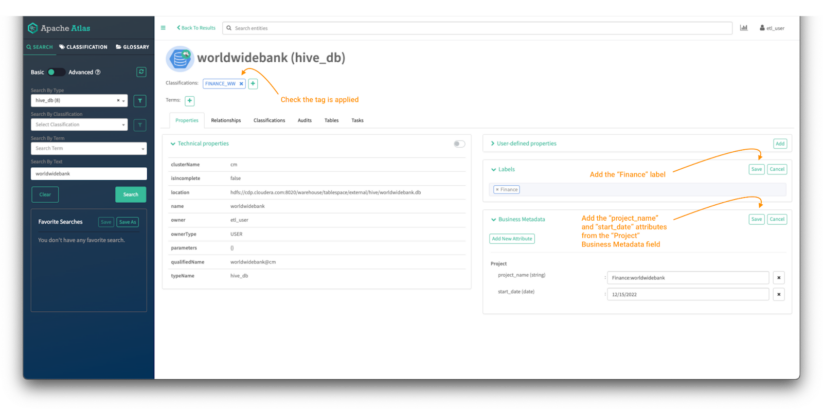
Picture 16 – Worldwide Financial institution database tag course of
Now, enrich the worldwidebank hive_db entity with a brand new label and a brand new enterprise metadata attribute known as “Challenge.”
- So as to add a label, click on “Add” on the labels menu.
- Kind the label within the house and click on “save.”
- So as to add a enterprise metadata attribute, click on “Add” on the enterprise metadata menu.
- Click on on “Add New Attribute” if it’s not assigned or “edit” if it already exists.
- Choose the attribute you need to add and fill the small print and hit “save.”
NOTE: The creation of the enterprise metadata attributes just isn’t included within the weblog however the steps might be adopted right here.
With the “worldwidebank” Hive object tagged with the “FINANCE_WW” classification, the information client ought to be capable of have entry to it and see the small print. Additionally, it is very important validate that the information client additionally has entry to all the opposite entities tagged with any classification that begins with “finance.”
2.3 Information Client – joe_analyst consumer
To validate that the insurance policies are utilized accurately, login into Atlas:
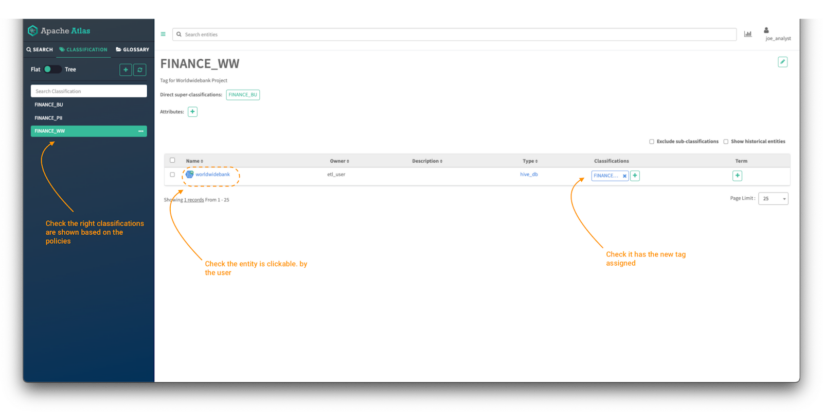
Picture 17 – Finance knowledge property
Click on on the classifications tab and validate:
- The listing of tags which are seen primarily based on the insurance policies created within the earlier steps. All of the insurance policies should begin with the phrase “finance.”
- Click on on the FINANCE_WW tag and validate the entry to the “worldwidebank” hive_db object.
After clicking on the “worldwidebank” object:
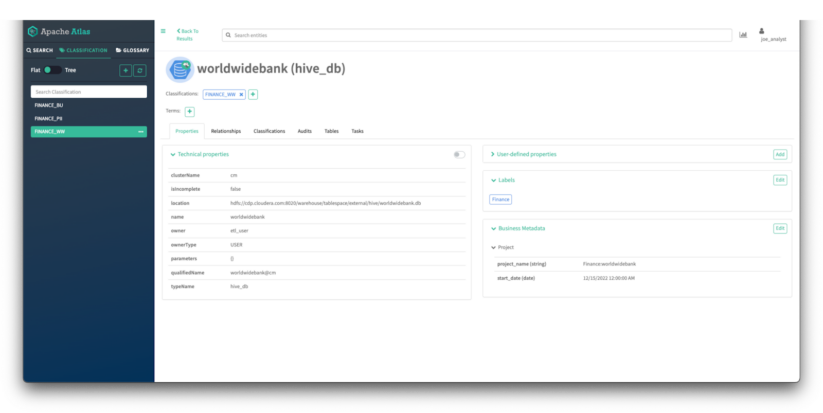
Picture 18 – WorldWideBank database asset particulars
You’ll be able to see all the small print of the asset that the place enriched by the finance knowledge curator in earlier steps:
- It is best to see all of the technical properties of the asset.
- It is best to be capable of see the tags utilized to the asset
- It is best to see the labels utilized to the asset.
- It is best to see the enterprise metadata attributes assigned to the asset.
3. Authorization for Glossary and Glossary Phrases
On this part, we are going to clarify how an information steward can create insurance policies to permit fine-grained entry controls over glossaries and glossary phrases. This enables knowledge stewards to manage who can entry, enrich or modify glossary phrases to guard the content material from unauthorized entry or errors.
A glossary supplies acceptable vocabularies for enterprise customers and it permits the phrases (phrases) to be associated to one another and categorized in order that they are often understood in numerous contexts. These phrases might be then utilized to entities like databases, tables, and columns. This helps summary the technical jargon related to the repositories and permits the consumer to find and work with knowledge within the vocabulary that’s extra acquainted to them.
Glossaries and phrases will also be tagged with classifications. The good thing about that is that, when glossary phrases are utilized to entities, any classifications on the phrases are handed on to the entities as nicely. From an information governance course of perspective, which means that enterprise customers can enrich entities utilizing their very own terminology, as captured in glossary phrases, and that may routinely apply classifications as nicely, that are a extra “technical” mechanism, utilized in defining entry controls, as we have now seen.
First, we are going to present how as an information steward you’ll be able to create a coverage that grants learn entry to glossary objects with particular phrases within the identify and validate that the information client is allowed to entry the precise content material.
3.1 Information Steward – admin consumer
To create a coverage to manage entry to glossaries and phrases, you’ll be able to:
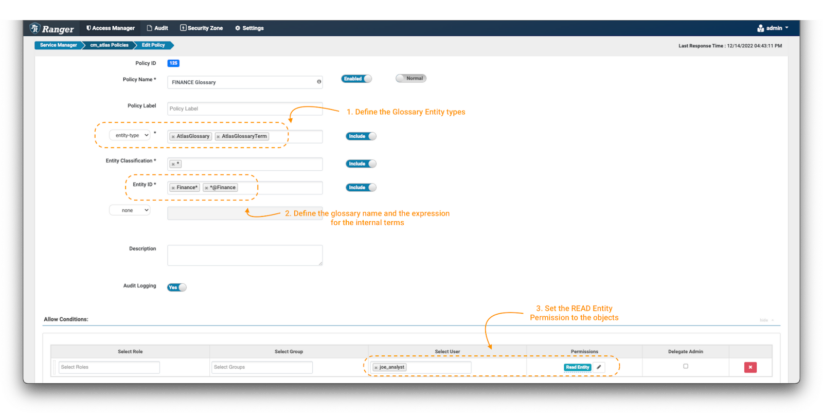
Picture 19 – Glossary management coverage
- Create a brand new coverage, however this time use the “entity-type” AtlasGlossary and AtlasGlossaryTerm. (be aware 1)
- Within the entity classifications subject, use the wildcard expression: *
- The entity ID is the place you’ll be able to outline which glossaries and phrases you need to shield. In Atlas, all of the phrases of a glossary embody a reference to it with an “@” on the finish of its identify (ex. time period@glossary). To guard the “Finance” glossary itself, use Finance*; and to guard is phrases, use *@Finance (be aware 2).
- Within the Situations, choose the permissions Learn Entity to the information client joe_analyst to have the ability to see the glossary and its phrases. (be aware 3)
3.2 Information Client – joe_analyst consumer
To validate that solely “Finance” glossary objects might be accessed:
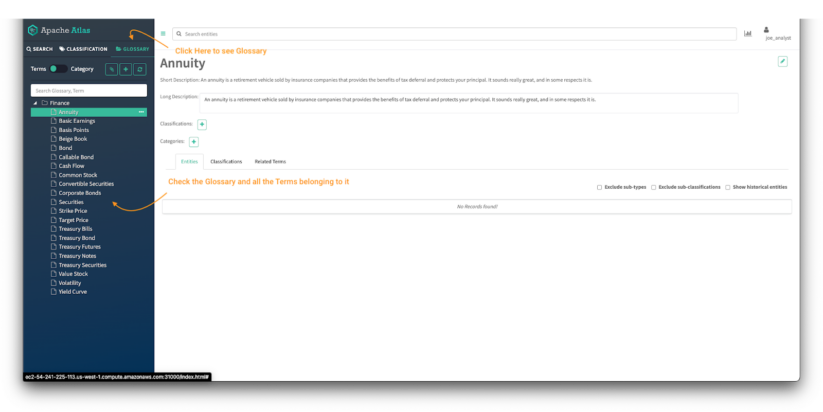
Picture 20 – Finance Atlas glossary
- Click on on the glossary tab within the Atlas panel.
- Test the glossaries out there within the Atlas UI and the entry to the small print of the phrases of the glossary.
Conclusion
This text has proven how a company can implement a fantastic grained entry management technique over the information governance elements of the Cloudera platform, leveraging each Apache Atlas and Apache Ranger, the basic and integral elements of SDX. Though most organizations have a mature method to knowledge entry, management of metadata is often much less nicely outlined, if thought-about in any respect. The insights and mechanisms shared on this article may help implement a extra full method to knowledge in addition to metadata governance. The method is crucial within the context of a compliance technique the place knowledge governance elements play a crucial function.
You’ll be able to study extra about SDX right here; or, we’d like to hear from you to debate your particular knowledge governance wants.