

For this challenge, we might be setting up a ChatGPT Terminal fully hands-free – taking questions & replying solutions absolutely in a handsfree method!
Whereas Pi-zero is a full-fledged laptop, ESP32, Arduino UNO & Mega or Maixduino are mere MCUs. Subsequently, they are going to definitely be many occasions inferior to Pi-zero. However should you examine the shape issue, variety of GPIOs, pace and price, Pi-zero 2W is tremendous aggressive! It might do all that the opposite MCUs can do besides onboard an analog-to-digital converter. For an analog-to-digital converter, we’ve to make use of a further [ADC] chip [like MCP3008] with Raspberry Pi. Pi-zero is offered for as little as INR:1600 at many shops whereas Arduino Mega additionally prices an identical value! I can say if the Arduino fever is over now then the small laptop cum MCU-like boards like Pi Zero, Orange Pi, Nano Pi, and Banana Pi are on the rise now.

Sound output on Pi Zero
There is no such thing as a sound output on the Pi-Zero board. To have sound output one has to attach an HDMI gadget [in other words a TV] to Pi-Zero and the sound will come out in regular method. There are HDMI-to-AV output gadgets which can be utilized to separate out the video and audio output. After it’s a must to connect an amplifier to breed the weak audio sign to a loudspeaker. Nevertheless, there may be one other simpler method which is proven within the schematic. Any two of the PWM GPIO pins [12,13,18,19] can be utilized to pressure audio output by including only one line in /boot/config.txt file. dtoverlay=audremap,pins_18_13. The audio is taken out utilizing a small filter association adopted by a 2-watt PAM8403 amplifier.
Schematic of audio output
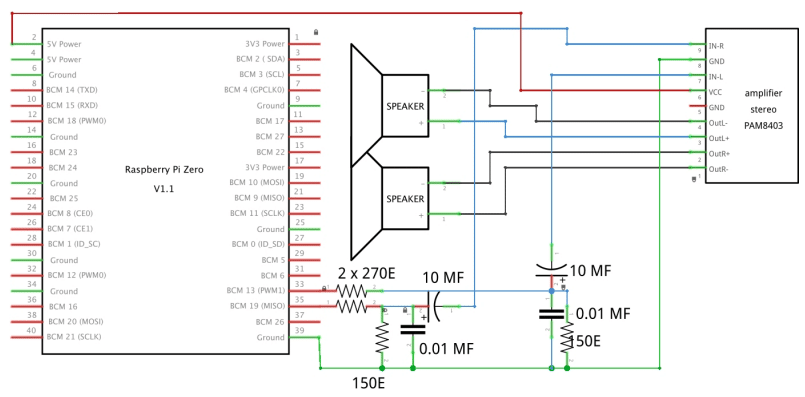
The amplifier is rated for 5Volt nevertheless it works on 3.3 volts with a small speaker
BOM
- Raspberry Pi zero 2W – INR:1600
- PAM8403 Amplifier – INR:50
- 4OHM Audio system [02 nos] – INR:120
- USB microphone – INR:170
- OTG cable for attaching a standard USB microphone

Pi-zero has just one micro USB port for exterior connections. To attach a standard USB to it, we want an OTG cable whose one facet is a male micro USB and the opposite facet is a standard feminine USB so that you could insert the USB microphone.

Sequence of Operations
It is a fully hands-free operation. Our directions might be offered by audio message and the solutions might be audio once more! There might be a push button. When you press it, the gadget will ask you to reply the query. When you full the query inside 10 seconds, the gadget will search your affirmation via a sure or no audio response. If no, it is going to ask you to begin another time. If sure, it is going to ask ChatGPT to supply the reply. As soon as it receives the reply, it is going to converse it out for you. After the sequence, it is going to anticipate a button press! The loop goes infinite!
The button press is made bounce-free to keep away from a number of operating of the identical code.
Mission code: Earlier than you begin this challenge you must get your chatgpt api-key which is offered free of charge from openai.com. HerePlease register your electronic mail deal with after which get the api-key which must be inserted within the api-key variable in vi_chatgpt.py code.

button_listener.py = It is a button press code, which screens a GPIO button [17 here, you can change it]. As soon as the button is pressed, it is going to begin a shell program
– vi_chatgpt.sh.
vi_chatgpt.sh = This code will begin the primary code – vi_chatgpt.py. This code is to be made executable by issuing a command like this.
$> chmod +x vi_chatgpt.sh
vi_chatgpt.py = Foremost challenge code which when completed, will launch management to button_listener.py once more to observe the following button press occasion
Autostart on boot: To make the code hearth up on each boot of Pi-zero, first be certain that the Pi zero logs robotically into console mode [or graphics mode], You needn’t connect a monitor for that. You’ll be able to ssh to your pi-zero. Then within the dwelling folder [/home/bera/] there’s a .profile file, open that file utilizing nano.
$> nano /dwelling/bera/.profile, On the finish of that file, connect this line. Put it aside and shut it. python /dwelling/bera/button_listener.py & Subsequent time you reboot, this system will begin robotically and can anticipate the button press occasion!
Software program
Some software program chances are you’ll want to put in first.
$> pip set up open
$> pip set up speech_recognition
$> pip set up subprocess
Additionally, it’s a must to be certain that SSH is turned on in your Raspberry Pi configuration and Web is offered in your community. Surprisingly it has been discovered that the USB microphone could be very delicate to catching sound from the opposite nook of the room amidst a cut up AC indoor unit is on. The ceiling fan is to be prevented or may be run on the slowest pace
Aftermath
It’s doable to even exchange the ‘button press’ occasion by a hard and fast audio command like – ‘Daisy begin’ or ‘Daichi begin’ and so forth. nevertheless it makes the Pi-zero operation distinctively sluggish however certain it is going to work higher in Pi-4 or Pi-5. Assist has been sought & obtained throughout the making of this challenge from openai.com
Obtain Supply Code