
Introduction
Within the earlier article, We went via the method of constructing a machine-learning mannequin for sentiment evaluation that was encapsulated in a Flask software. This Flask software makes use of sentiment evaluation to categorize tweets as constructive or destructive. Prepared for implementation, the whole venture is version-controlled on GitHub. Shifting additional, we are going to now stroll over the right way to use Gunicorn and Nginx to deploy this Flask software on a cloud server, guaranteeing the machine studying mannequin is scalable and accessible in a manufacturing setting.
You may comply with the earlier article on The best way to Deploy a Machine Studying Mannequin utilizing Flask?
Selecting up the place we left off, we are going to use Gunicorn and NGINX to deploy this Flask software onto a cloud server. This put up will clarify transferring a Flask software initially hosted regionally for machine studying deployment to the cloud.

Steps Embody
- Arrange an AWS EC2 Occasion: Launch an AWS EC2 occasion with Ubuntu because the working system. Configure safety teams to permit inbound site visitors.
- SSH into the EC2 Occasion: Use SSH to hook up with your EC2 occasion out of your native macWeis. We require an SSH key pair (private and non-private )to attach together with your native system.
- Deploy Flask Software: Switch the Flask software information to the EC2 occasion. If the mannequin is already on Git Hub, clone it into the EC2 Ubuntu occasion. Then, Arrange a digital setting and set up the required Python packages or the necessities file within the listing utilizing pip. Check whether or not the Flask software runs accurately within the EC2 setting.
- Set up Dependencies: Replace the bundle lists for upgrades and set up obligatory dependencies, corresponding to Python, pip, and every other libraries required by your Flask software.
- Set up and Configure Gunicorn: Set up Gunicorn, a WSGI HTTP server for Python purposes. Create a Gunicorn service file to handle the applying course of. Begin and allow the Gunicorn service to run within the background.
- Set up and Configure NGINX: Set up NGINX, a high-performance internet server, and reverse proxy. Configure NGINX to ahead incoming HTTP requests to the Gunicorn server. Arrange server blocks (digital hosts) to your Flask software.
- Configure Area Title (Optionally available): If in case you have a site identify, configure DNS settings to level to your EC2 occasion’s public IP handle. If not, you’ll be able to entry your Flask software straight from the general public IP handle.
- Safe the Software: Allow HTTPS for safe communication between shoppers and the server. Get hold of an SSL/TLS certificates (e.g., Let’s Encrypt) and configure NGINX to make use of it.
- Check the Deployment: As soon as every little thing is about up, take a look at your deployed Flask software by accessing it via an internet browser or sending requests utilizing cURL or Postman.
Following these steps, we’ll efficiently deploy your Flask software for machine studying on an AWS EC2 occasion, using Gunicorn because the WSGI server and NGINX as a reverse proxy server to deal with incoming requests effectively and securely.
Earlier than Entering into the hands-on, Let’s perceive how it’s performed.
Understanding the Communication: Flask, Gunicorn, and Nginx
             +-----------------------------+
             |           Shopper            |
             +-----------------------------+
                          |
                          |
             +------------v-------------+
             |        NGINX (Port 80)   |
             +------------+-------------+
                          |
                          |
             +------------v-------------+
             |       Gunicorn           |
             |     (WSGI Server)        |
             +------------+-------------+
                          |
                          |
             +------------v-------------+
             |   Flask Software      |
             |       (Python)           |
             +--------------------------+
Flask: The Centre of the Software
Flask is a light-weight and versatile Python internet framework that gives the instruments to construct internet purposes/companies. It’s the basis of your sentiment evaluation service, dealing with incoming internet requests, processing them utilizing your machine studying mannequin, and returning the evaluation outcomes. Flask operates as the applying layer in our stack.
We already created the Flask software within the earlier article. And clone it utilizing the command.
https://github.com/Geek-shikha/Flask_model_sentiment_analysis.gitFlask alone cannot deal with a number of requests at a time; that’s when Gunicorn comes into play.
Gunicorn: The Python WSGI HTTP Server
Gunicorn acts as an middleman layer that interfaces with Flask. It’s a Python WSGI HTTP server designed for UNIX methods, providing a easy but environment friendly method to deploy Python internet purposes. Once you run your Flask app with Gunicorn, it creates a WSGI server that communicates with the Flask software. Gunicorn manages a number of employee processes to deal with incoming requests, distribute the load, and improve the flexibility to deal with concurrent customers. No. The variety of employees and threads is determined by the variety of cores of the system, 2*Cores +1.
Till you may have multithreading, there is no such thing as a separate reminiscence area. A single employee can deal with A number of Requests from the shoppers in parallel.
Why is Gunicorn Required?
For varied causes, Gunicorn, or Inexperienced Unicorn, is an important part in internet hosting Flask purposes. Firstly, Flask’s built-in growth server can’t deal with a number of requests concurrently, making it unsuitable for manufacturing environments. Its pre-fork employee mannequin permits scalability by operating quite a few employee processes or threads, accommodating elevated site visitors successfully. G unicorn’s load balancing distributes requests evenly, enhancing efficiency underneath heavy hundreds. Compliant with the WSGI specification, Gunicorn seamlessly integrates with Flask and different WSGI-compliant frameworks, simplifying deployment. Gunicorn offers important options corresponding to concurrency, scalability, efficiency, and compatibility, making it indispensable for deploying Flask purposes in manufacturing.
Nginx: The Frontline Reverse Proxy
Nginx is a strong, high-performance internet server recognized for its stability, easy configuration, and low useful resource consumption. In our deployment, Nginx is configured as a reverse proxy, sitting in entrance of Gunicorn. It receives consumer requests and forwards them to Gunicorn, which, in flip, communicates with the Flask software. Nginx can also be chargeable for serving static information, dealing with SSL/TLS encryption, and probably load balancing in case your software scales to a number of servers.
Why Nginx?
Other than offering Furthermore, NGINX excels in dealing with a number of fashions or purposes concurrently, because of its strong load balancing capabilities and buffering mechanisms. Whereas Gunicorn could battle with the pace of processing a number of requests, NGINX can effectively deal with this workload by buffering requests, guaranteeing smoother operation. Moreover, NGINX offers important options like SSL termination, token authentication, and cargo balancing, making it indispensable for securing and optimizing Flask purposes. For additional scalability and suppleness, Docker or Kubernetes might be built-in alongside NGINX, enabling dynamic scaling and simplified administration of companies. Whether or not deployed on AWS or Kubernetes, NGINX stays a flexible and highly effective software for internet hosting Flask purposes at scale.
Pre Requisites
Earlier than Utilizing the steps to deploy your mannequin, it’s best to perceive and have the next.
AWS Account: You want an AWS account to entry EC2 and different AWS companies. For those who don’t have an account, you’ll be able to join one on the AWS web site.
If you would like your app to seem with a reputation, you will need to have a site identify configured to level to your server. You may get one free of charge on Freenom. We don’t want this right here since we are going to use the general public IP handle straight.
Understanding of WSGI file specification and servers, proxy, and ports. A Little understanding will even assist.
Deploying Machine Studying Mannequin Utilizing Flask on AWS with Gunicorn and Nginx
STEP 1: Arrange an AWS EC2 Occasion
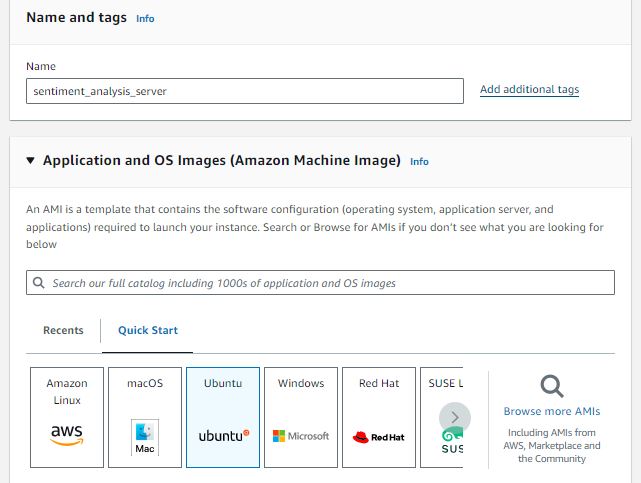
Launch an AWS EC2 occasion with Ubuntu because the working system. A micro Service would work simply effective. We’re maintaining the occasion’s identify as sentiment_analysis_server. You’re free to decide on what you want. However keep in mind, the occasion’s service choice is determined by the size of the applying you are attempting to host.
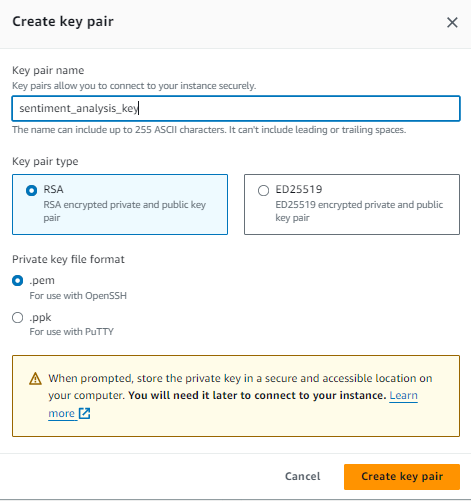
Create a key pair to attach securely together with your EC2 via SSH. Once you create an EC2 occasion, you specify a key pair, and the corresponding non-public key file (.pem) is used to authenticate your SSH connection to the occasion. Use an RSA-type key pair and comply with the beneath steps.
- Create Key Pair: Click on the “Create key pair” button to generate the important thing pair.
- Obtain Non-public Key: As soon as the important thing pair is created, a non-public key file (.pem) can be robotically downloaded to your native machine. This non-public key file authenticates SSH connections to your EC2 situations.
Launch your occasion with safety configurations that enable port and http site visitors. After launching and connecting to your occasion, copy the SSH command from it so you’ll be able to put up it in your native terminal to entry the occasion remotely. Within the following picture, the inexperienced highlighted portion is what it’s essential to copy and paste into your native/terminal.
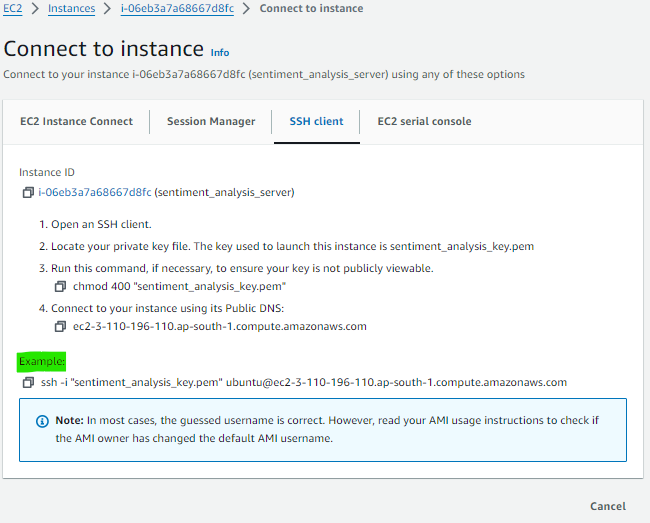
STEP 2: SSH into the EC2 Occasion
Open your laptop’s terminal. In case your non-public key file (.pem) is positioned in a listing, you’ll have to specify the complete path to the important thing file when utilizing the SSH command to hook up with your EC2 occasion. Right here’s how you are able to do it:
Let’s say your key(.pem file) is in Downloads. Then, it’s essential to place your SSH command there. So, all it’s essential to do is open your terminal, navigate to the Downloads listing, and paste your command there.
cd ~/DownloadsNow Paste your SSH command, which could seem like the instance: ssh -i “sentiment_analysiskey.pem” [email protected]

STEP 3: Putting in the required Parts from the Ubuntu Repositories
Step one is to put in all obligatory elements from the Ubuntu repositories. This contains the Python elements, which Pip will handle, and the Python bundle supervisor. The Python growth information required to assemble Gunicorn elements will even be supplied. When putting in the packages that allow you to create your Python setting, you will need to first replace the native bundle index.
sudo apt replace
sudp apt improve
Then, set up the Python-pip command to put in pip and the digital setting.
sudo apt set up python3-pip
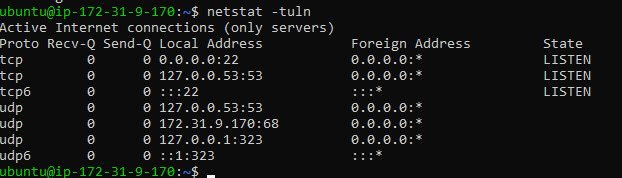
sudo apt set up python3-venvThen, set up the web stat bundle. The web-tools bundle shows network-related data, corresponding to lively community connections, routing tables, interface statistics, and so on.
sudo apt set up net-tools
sudo apt set up net-tools

netstat tuln #after putting in run this command
It shows an inventory of lively community connections and listening ports on the system:
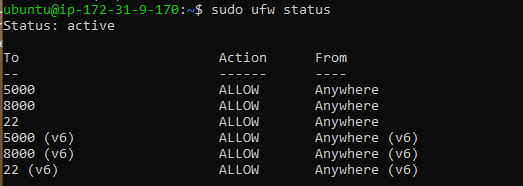
Then set up the firewall bundle: the ufw (Uncomplicated Firewall) bundle is a front-end for managing iptables firewall guidelines on Ubuntu and different Debian-based Linux distributions. It offers a simplified interface for configuring firewall guidelines, making it simpler to arrange important firewall safety to your system
- sudo ufw allow: Permits the firewall.
- Sudo ufw enable /: This command permits incoming connections on a particular port and protocol (e.g., sudo ufw permits 22/TCP to allow SSH connections).
- Sudo ufw standing: Shows the present standing and guidelines of the firewall.
sudo apt set up ufw #
sudo ufw enable 22 #ssh entry
sudo ufw enable 5000  #5000 port for flask app take a look at

sudo ufw standing - Sudo ufw enable 5000: This enables incoming connections on port 5000. By default, it permits each TCP and UDP site visitors on this port. We can be operating our Flask app on 5000, so the Flask app service operating on port 5000 must be accessible from the community.
- Sudo ufw enable 22: This command permits incoming SSH connections on port 22. SSH is used for distant entry to your system, and permitting connections on port 22 permits you to hook up with your server by way of SSH securely. That is necessary; you shouldn’t flip this off, as you received’t be capable of entry your SSH remotely.
Step 4: Deploy the Flask Software and Set Up the Software
Deploy Flask Software: Switch the Flask software information to the EC2 occasion. If the mannequin is already on Git Hub, clone it into the EC2 Ubuntu occasion. Then, Arrange a brand new digital setting and set up the required Python packages or the necessities file within the listing utilizing pip. Then, the Check Flask software runs accurately within the EC2 setting.
In our case, we’re cloning a git repository, which we used within the final article to investigate the sentiment of a tweet.
However first, ensure the git is put in. If it’s put in, run the command: git clone -b grasp –single-branch https://github.com/Geek-shikha/Flask_model_sentiment_analysis.git
git --version # if this exists you needn't to sudo apt set up git
git clone -b grasp --single-branch
https://github.com/Geek-shikha/Flask_model_sentiment_analysis.git #identical line

#after cloning the repository go tot the listing and checklist all of the information
cd Flask_model_sentiment_analysis
ls
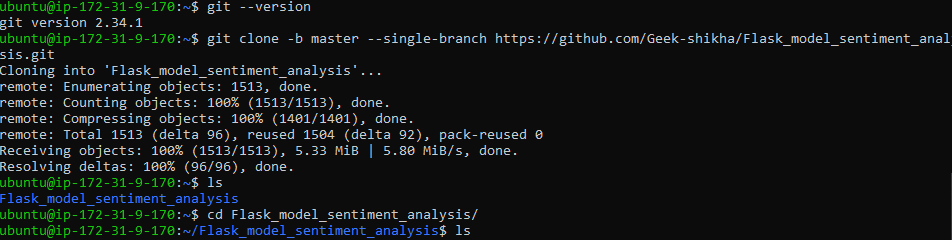

Be aware: Once you clone the repository, you’ll not see any app.py file; as an alternative, myproject.py is current, which we require.
There’s an present digital setting that we created beforehand whereas making a Flask app regionally. We have to create a brand new digital setting to keep away from errors or discrepancies. The brand new digital setting is known as “myprojectenv” and should be activated.
python -m venv myprojectenv #digital env named as myprojectenv
supply myprojectenv/bin/activate #activate the digital setting
Set up the Python libraries saved in necessities.txt
pip set up -r necessities.txt #set up the dependencies like flask, nltk and so on.Now take a look at and run your Python Flask software
python3 myproject.pyBy operating this, you’ll be able to see an output within the terminal like this :

To see whether it is working. Go to your server’s IP handle adopted by:5000 in your internet browser. In your internet browser, your server IP is 5000, like http://server_pub_ip:5000. Let’s say the server IP is 23.124.09.133. Then put http://23.124.09.133:5000
Step 5: WSGI file
Subsequent, create a file that may function the entry level to your software. This file will instruct the Gunicorn server to work together with the applying.
create a wsgi.py file within the Flask_model_sentiment_analysis folder
nano ~/Flask_model_sentiment_analysis/wsgi.py On this file, import the Flask occasion from our software, which we named myproject.py, after which run it:
from myproject import app

if __name__ == "__main__":
    app.run()
You may also set up sudo apt and unicorn if there may be any error.
Step 6: Gunicorn Configuration
Let’s start by configuring Gunicorn and binding the wsgi app to port 5000
unicorn configure command begins a Gunicorn server that listens for incoming connections on port 5000 from any IP handle and serves the WSGI software named app outlined within the wsgi.py file.
gunicorn --bind 0.0.0.0:5000 wsgi:appOutput:

Verify whether it is working. Go to your server’s IP handle adopted by:5000in your internet browser: In your internet browser, your server IP is 5000, like http://server_pub_ip:5000; let’s say the server IP is 23.124.09.133. Then put http://23.124.09.133:5000
It ought to offer you an output like this :
For those who get the right response, cease the service; you’ll be able to press ctrl+c after which deactivate your digital setting by giving the command. Subsequently, Create the system and repair unit file. This motion will allow Ubuntu’s init system to robotically provoke Gunicorn and host the Flask software upon server boot.
sudo nano /and so on/systemd/system/myproject.serviceAdd the next content material :
[Unit]
Description=Gunicorn occasion to serve myproject
After=community.goal

[Service]
Person=ubuntu
Group=www-data
WorkingDirectory=/dwelling/ubuntu/Flask_model_sentiment_analysis
Setting="PATH=/ubuntu/Flask_model_sentiment_analysis/myprojectenv/bin"
ExecStart=/dwelling/ubuntu/Flask_model_sentiment_analysis/myprojectenv/bin/gunicorn
--workers 3 --bind unix:myproject.sock -m 007 w>
[Install]
WantedBy=multi-user.goal- [Unit]: This part specifies metadata and dependencies for the unit.
- Description: Describes the service.
- After=community.goal: It signifies that this unit begins after the community is up, guaranteeing community connectivity earlier than the service begins.
- [Service]: This part defines the parameters for the service.
- Person=ubuunit: It specifies the consumer account underneath which the service ought to run.
- Group=www-data: Units the group for the service.
- WorkingDirectory: Specifies the working listing for the service.
- Setting=”PATH=/ubuntu/Flask_model_sentiment_analysis/myprojectenv/bin”: This variable defines the service’s setting variables, explicitly setting the PATH variable to incorporate the digital setting’s binary listing.
- ExecStart: Specifies the command to start out the service. On this case, it begins Gunicorn with particular choices:
- –employees 3: Configures Gunicorn to make use of three employee processes.
- –bind unix: my venture.sock: Specifies the socket file via which Gunicorn will talk with the online server (e.g., Nginx or Apache).
- -m 007: Units the masks to 007, controlling the permissions of information created by Gunicorn.
- wsgi:app: Signifies the situation of the WSGI software to serve.
- [Install]: This part defines set up data for the unit.
- WantedBy=multi-user.goal: Specifies the goal into which this unit must be put in. On this case, it’s set to multi-user. Goal, an ordinary goal for consumer methods, signifies that the service ought to begin robotically throughout system boot.
In abstract, this technique unit file units up Gunicorn to serve a Flask software with particular configurations and ensures that the service begins robotically upon system boot.
Time to start out the Gunicorn service that you simply created and allow it in order that it begins at boot:
sudo systemctl begin myproject
sudo systemctl allow myproject
sudo systemctl standing myproject#test the standing of your service file for errors, ifany
If the command resists, then use this to reload “sudo systemctl daemon-reload,”
If in case you have adopted every step, there must be no errors; nonetheless, if the error persists, resolve the error. There might be an error within the path or setting within the service file. Verify Fastidiously
Step 7: Set up and Configure NGINX
The Gunicorn software server is operational and awaiting requests by way of the socket file within the venture listing. Now, we will configure Nginx to direct internet requests to this socket by implementing minor modifications to its configuration file. For this, we have to set up nginx first
sudo apt set up nginxBegin by producing a contemporary server block configuration file inside Nginx’s sites-available listing. Title this file “venture” in order to not get confused. We’ve been utilizing the identify myproject.py beforehand
sudo nano /and so on/nginx/sites-available/myprojectso as to add the content material to the file, which has Nginx server block configuration guaranteeing that incoming HTTP requests to the required server IP handle are forwarded to the Gunicorn software server by way of the Unix socket file, permitting the Flask software to deal with the requests. Save the file and are available out of the editor.
server {
    hear 80;
    server_name 3.110.196.110; #your server public ip

    location / {
        embody proxy_params;
        proxy_pass http://unix:/dwelling/ubuntu/Flask_model_sentiment_analysis/myproject.sock;
    }
}- Server { … }: This block defines a server configuration inside Nginx. It encapsulates the configuration settings for dealing with requests for a particular server.
- Hear 80: This directive specifies that Nginx ought to hear for incoming HTTP requests on port 80, the default port for HTTP site visitors.
- server_name 3.110.196.110: This directive units the server’s hostname or IP handle. On this case, it’s set to three.110.196.110, which must be changed together with your server’s public IP handle.
- Location / { … }: This block defines how Nginx ought to deal with requests for the basis listing / of the server.
- Embody proxy_params: This directive offers configuration settings from the proxy_params file. These settings usually comprise proxy-related configurations, corresponding to proxy headers.
- proxy_pass http://unix:/dwelling/ubuntu/Flask_model_sentiment_analysis/myproject.sock: This directive specifies that Nginx ought to ahead incoming requests to the required Unix socket file positioned at /dwelling/ubuntu/Flask_model_sentiment_analysis/myproject.sock. That is the place Gunicorn listens to requests. Nginx will act as a reverse proxy, passing requests to Gunicorn and returning the responses to the consumer.
Now allow and take a look at for errors
sudo ln -s /and so on/nginx/sites-available/myproject /and so on/nginx/sites-enabled
sudo nginx -t- sudo ln -s /and so on/nginx/sites-available/myproject /and so on/nginx/sites-enabled: This command creates a symbolic hyperlink named myproject within the sites-enabled listing, pointing to the configuration file positioned within the sites-available listing. By doing this, you allow the server block configuration to your venture.
- Sudo nginx -t: This command assessments the Nginx configuration for syntax errors. It checks whether or not the Nginx configuration information, together with the newly enabled myproject server block, are accurately written and legitimate. If there are any errors, they are going to be reported throughout this take a look at.
Restart the nginx as we have now up to date the configurations
sudo systemctl restart nginxupdating the firewall for nginx
sudo ufw enable 'Nginx Full'Since we don’t want the 5000 port, we will disable it utilizing the command “sudo ufw delete enable 5000,” however we don’t have to disable port 22.
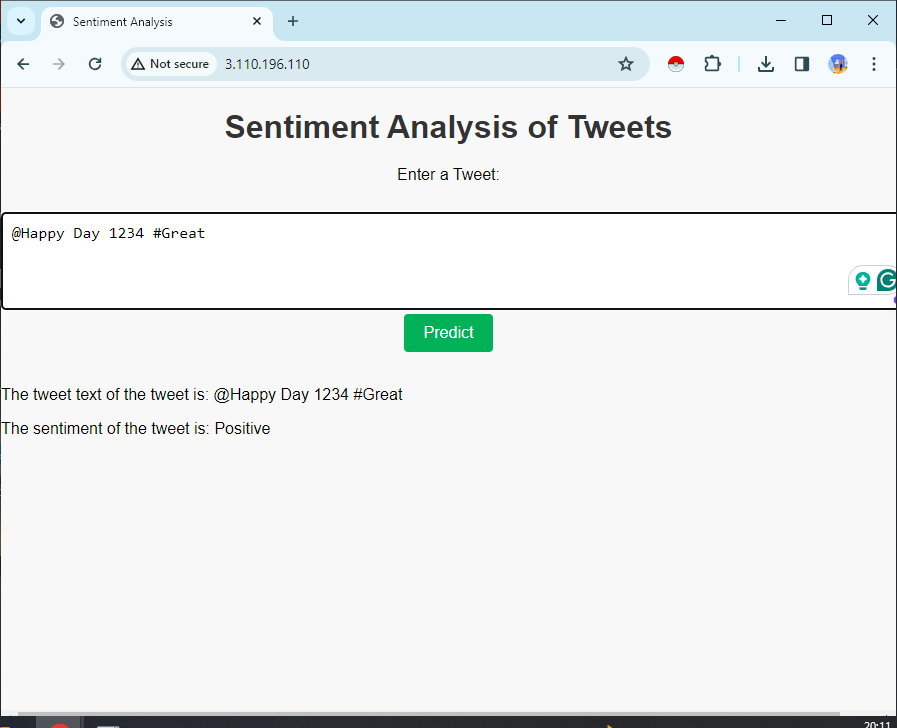
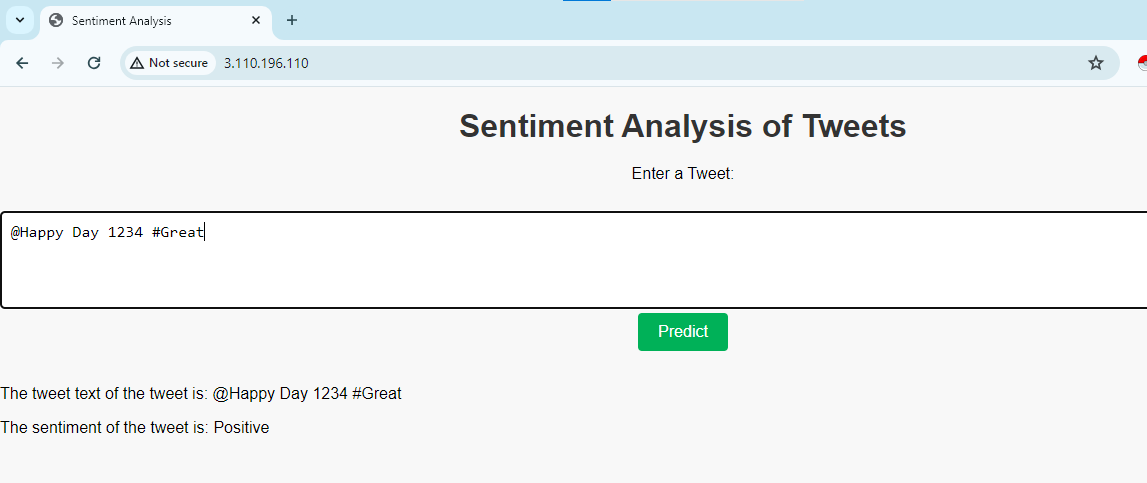
Now navigate to your server’s area identify(or IP handle) in your internet browser, and you will notice the output :
For those who see any error like 502 gateway,, it’s essential to change some permissions. Use the command
sudo chmod 755 /dwelling/ubuntuAdditionally, once you take a look at your server for the applying, it’s best to use http://….. and never https, as the applying shouldn’t be secured.
If there are errors, you’ll be able to test them via instructions like:

If you wish to cease the service, you need to use the command
sudo systemctl cease nginx #cease the service
sudo systemctl begin nginx# to start out the service
Additional Steps to Safe the Software
There are additional steps to safe the applying.
Allow HTTPS for safe communication between shoppers and the server. Get hold of an SSL/TLS certificates (e.g., Let’s Encrypt) and configure NGINX to make use of it. We will use Certbot to safe the applying.
To safe your internet server with SSL/TLS utilizing Certbot, you usually want a registered area identify. Certbot requires a site identify to problem SSL certificates as a result of it verifies area possession earlier than issuing the certificates. Whereas it’s technically doable to make use of a public IP handle as an alternative of a site identify, it’s not beneficial for a number of causes. One is Certificates Authority (CA) Necessities: Certificates Authorities (CAs) like Let’s Encrypt (which Certbot makes use of) have insurance policies in place that require area validation. They won’t problem SSL certificates for IP addresses.
If you wish to safe it, you need to use sudo apt set up python3-certbot-nginx and study extra about it in its documentation.
Conclusion
On this article, we created a primary Flask software inside a Python digital setting. We generated a WSGI entry level, enabling compatibility with any WSGI-capable software server, after which configured Gunicorn to satisfy this function. Subsequently, We crafted a system service file to provoke the applying server robotically upon system boot. Moreover, you constructed an Nginx server block chargeable for directing internet consumer site visitors to the applying server, successfully forwarding exterior requests, and safeguarding server site visitors with Let’s Encrypt encryption.